shape
carat
color
clarity

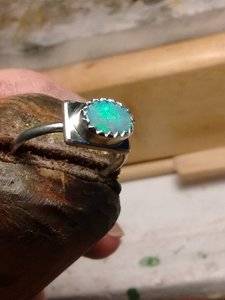
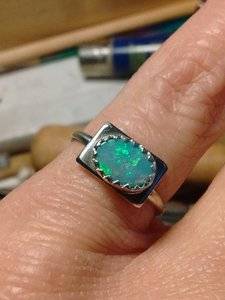
I was bored, so I made an opal ring

stracci2000

Ideal_Rock
Premium
Joined
Jun 26, 2007
Messages
8,775
I'm on vacation this week, and today the internet was down. What to do?
Make jewelry, of course! I took a lot of photos.
I stamp my work with a "D", for Stracci of course!
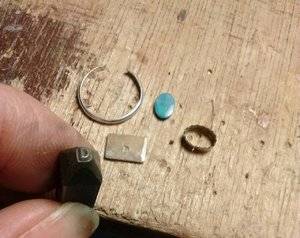
IMG_20181227_144342.jpg
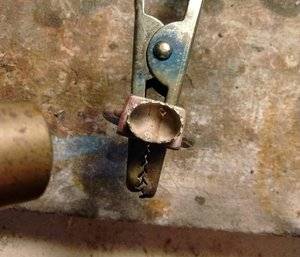
The blue streak is the flame from the torch.
IMG_20181227_145800.jpg
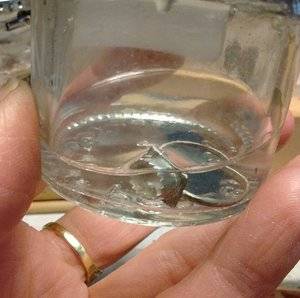
This is the pickle solution. It removes the dark discoloration that happens after heating.IMG_20181227_144455.jpg
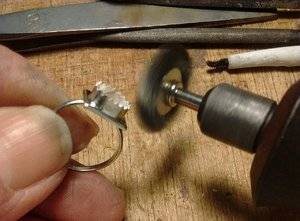
I gave it a brushed finish with a wire attachment on my rotary tool.
IMG_20181227_144503.jpg
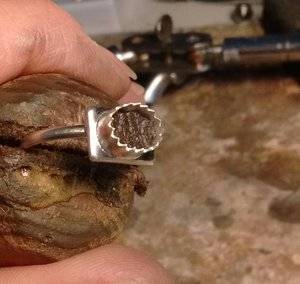
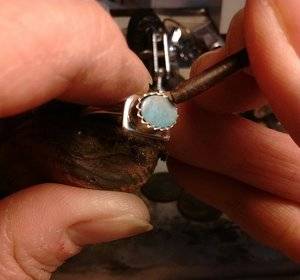
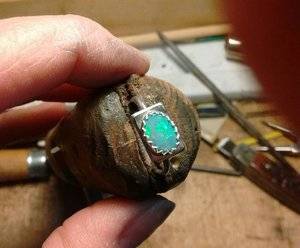
Here is a secret technique. It is a piece of leather inserted into the cup to create a cushion for the stone. Packed sawdust can also be used.
IMG_20181227_145607.jpg
I pressed the serrations down with the back end of a file.
IMG_20181227_144620.jpg IMG_20181227_144648.jpg IMG_20181227_143340124.jpg IMG_20181227_144155370.jpg IMG_20181227_145235971.jpg
 
Last edited:
oh you're marvellous! I can't even string beads properly!
 
I’m jealous of your talent!
 
Girl, I can't even, this is too good. There is a store here called Blue Moon and they sell artisan jewelry, this totally looks like something from that store :kiss2:
 
It looks fantastic!
 
The process of creating is so interesting and your final result is absolutely stunning. Thank you for taking us through the process with you.
 
Wow very cool!! Curious what happens to the leather (or sawdust) after you finish setting the stone? Water, etc?
 
Wow very cool!! Curious what happens to the leather (or sawdust) after you finish setting the stone? Water, etc?
It seems like a weird concept, I know, but it works so well!
The leather or sawdust remains in there. It raises the level of the stone, so the surface of the stone is closer to the top of the bezel. This gives the illusion of a deeper stone. The filler creates pressure, so the stone sits nice and tight, and won't shift or rattle.
Years from now, if I were to remove that opal, the leather would be hard and dense. If the filler was sawdust, it would be compacted and hard.
If you close up the bezel and set the stone very securely, water is not a factor. You can wear this kind of ring in the shower, wash dishes, etc., and nothing will happen.
This is how Native Americans set turquoise in their jewelry. I borrowed this concept from them.
 
Last edited:
Girl, I can't even, this is too good. There is a store here called Blue Moon and they sell artisan jewelry, this totally looks like something from that store :kiss2:
Yeah, and they probably sell it for way too much!
Steph, you must come over sometime and I will teach you.:wavey:
 
Yeah, and they probably sell it for way too much!
Steph, you must come over sometime and I will teach you.:wavey:

I want to learn, but the nearest teacher charges $112 per session. :shock: Who knows how long it would take to finish a piece?
 
I want to learn, but the nearest teacher charges $112 per session. :shock: Who knows how long it would take to finish a piece?
Wow, that's pricey. I was lucky that an acquaintance who is a silversmith sat down with me for one 3 hr. session, and taught me the basics. After that I was on my own. I learned alot from books and trade magazines. Youtube was also very helpful.

.
 
Wow, that's pricey. I was lucky that an acquaintance who is a silversmith sat down with me for one 3 hr. session, and taught me the basics. After that I was on my own. I learned alot from books and trade magazines. Youtube was also very helpful.

.

Your acquaintance is great!

Well, he’s based in a town of Silicon Valley elite, so I guess that goes with the pricing. :cry2:

There is a lapidary club I should check out, though.
 
Your acquaintance is great!

Well, he’s based in a town of Silicon Valley elite, so I guess that goes with the pricing. :cry2:

There is a lapidary club I should check out, though.
Where there are lapidaries, there are silversmiths! You should join the club and you will be making jewelry in no time!
 
Where there are lapidaries, there are silversmiths! You should join the club and you will be making jewelry in no time!

...And giving up manicures forever! :lol-2: Thanks for the tip!
 
You are really talented! So impressive! It looks great.:appl:
 
How fun! Beautiful opal!
 
Beautiful and cool trick with the leather. I once took a metalworking workshop and know the investment in time and attention to detail required to develop skills to do this as a simple free time project! What a cool hobby!
 
Ahhhh yes girl yes!!!

I swear you're going to drive me to start my metalsmithing journey early!!!

And im So flabbergasted by what you said; about being able to shower with that ring. I was always told to remove bezel set jewelry and never to get them wet, ever. I thought it especially applied to pieces that had material set in back of it.
I actually take off all of my jewelry when i wash my hands...even if its a gemstone and gold.
Wouldnt water get behind the stone after wearing the ring for a long time and mold grow between the leather and stone?

I'm genuinely asking as youve just shaken my world lol
And I'm assuming you can only wear jewelry set such as this (with some material in the back of it) in the shower? Or all bezeled rings if set tight enough?
Also how do you know if its set tight enough??

Sorry for the mountain of questions I'm just so interested in this idea.
 
I'm on vacation this week, and today the internet was down. What to do?
Make jewelry, of course! I took a lot of photos.
I stamp my work with a "D", for Stracci of course!
IMG_20181227_144342.jpg
The blue streak is the flame from the torch.
IMG_20181227_145800.jpg
This is the pickle solution. It removes the dark discoloration that happens after heating.IMG_20181227_144455.jpg
I gave it a brushed finish with a wire attachment on my rotary tool.
IMG_20181227_144503.jpg
Here is a secret technique. It is a piece of leather inserted into the cup to create a cushion for the stone. Packed sawdust can also be used.
IMG_20181227_145607.jpg
I pressed the serrations down with the back end of a file.
IMG_20181227_144620.jpg IMG_20181227_144648.jpg IMG_20181227_143340124.jpg IMG_20181227_144155370.jpg IMG_20181227_145235971.jpg

Ahhhh yes girl yes!!!

I swear you're going to drive me to start my metalsmithing journey early!!!

And im So flabbergasted by what you said; about being able to shower with that ring. I was always told to remove bezel set jewelry and never to get them wet, ever. I thought it especially applied to pieces that had material set in back of it.
I actually take off all of my jewelry when i wash my hands...even if its a gemstone and gold.
Wouldnt water get behind the stone after wearing the ring for a long time and mold grow between the leather and stone?

I'm genuinely asking as youve just shaken my world lol
And I'm assuming you can only wear jewelry set such as this (with some material in the back of it) in the shower? Or all bezeled rings if set tight enough?
Also how do you know if its set tight enough??

Sorry for the mountain of questions I'm just so interested in this idea.
SO COOL! Thanks for sharing your process. I love the ring you made.
 
Ahhhh yes girl yes!!!

I swear you're going to drive me to start my metalsmithing journey early!!!

And im So flabbergasted by what you said; about being able to shower with that ring. I was always told to remove bezel set jewelry and never to get them wet, ever. I thought it especially applied to pieces that had material set in back of it.
I actually take off all of my jewelry when i wash my hands...even if its a gemstone and gold.
Wouldnt water get behind the stone after wearing the ring for a long time and mold grow between the leather and stone?

I'm genuinely asking as youve just shaken my world lol
And I'm assuming you can only wear jewelry set such as this (with some material in the back of it) in the shower? Or all bezeled rings if set tight enough?
Also how do you know if its set tight enough??

Sorry for the mountain of questions I'm just so interested in this idea.
@TheGarnetGirl, Stones always need to be set tight, regardless of the setting style.
When you create the bezel, you cut a strip of sterling and solder it into a shape to encircle the stone. Then you drop the stone in the "collar" you made to see if it is perfectly tight. You must make sure it is very tight around the circumference of the stone. You then solder a base under the bezel(without the stone in there!) When you place the stone into the bezel (on top of the filler material) it will create a cap over your filler material.
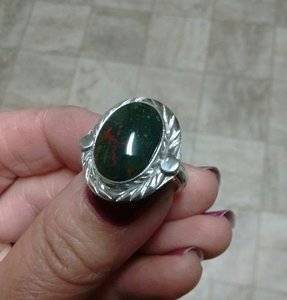
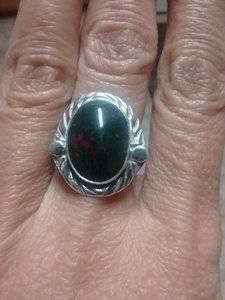
Look at this bloodstone ring below. I made sure it was sealed up very tight. If you enlarge these photos, you can see how tight the bezel is.
When you rub the bezel over the stone, it creates a seal. No water is gonna get in there. I have never seen mold inside an old ring. Just hard, dried leather or packed sawdust.

IMG_20171005_220804.jpg
IMG_20171005_224227464.jpg
 
Last edited:
So pretty!
( didn't even make my bed today)
 
Thank you so much for sharing this! What a fabulous hobby and beautiful work!
 
GET 3 FREE HCA RESULTS JOIN THE FORUM. ASK FOR HELP

Featured Topics

Top