- Joined
- Jul 12, 2015
- Messages
- 2,290
Hi ladies (and gents) 
Okay, I can't hold out any longer. I had wanted to wait and do a "grand reveal" once my ring was finished but I'm just too excited - lol! Let me start by saying two things: one, this is a LONG post with details on how the design came to be, so if you don't care about that feel free to skip to just the photos, and two, I understand that my style may not resonate for some so if you don't like my design that's okay, but I ask you not to suggest tweaks or anything like that because we LOVE it and have already given our approval for production. Yes, that last request is because I have a tender heart and want to believe that everyone is going to love my ring, no matter how much I tell myself that others opinions don't matter
And, of course, how could I also not say a HUGE thank you to all of you. Seriously. Without all of the existing wisdom and insight I learned from, as well as answers to specific questions I had, I never ever would have ended up with this ring.
And now, on to the show!!!
Designer is CvB. I'll do a full write-up on working with her when I do a SMTB thread.
We initially had some communication problems with her and ended up waiting about five weeks from the time we hired her until we actually officially started on the design. I mention it because, while that was frustrating in some respects, during that time I discovered I have a love of concept doodling and it gave BF and I a chance to hash out exactly how we wanted the ring to look. I knew I wanted a vintage and delicate ring using mixed metal (platinum and rose gold) that also had sentimental aspects to it, and he wanted to make sure the center stone wasn't overwhelmed with other details; putting those pieces together took time but created some special memories for us in the process. Anyway, once Caysie was ready to start the project I was able to send her my drawings and examples of what we wanted and asked her to use her amazing skills to combine it all so it was artsy and flowed. She NAILED it!!!
Here's what I sent her...
Top view:
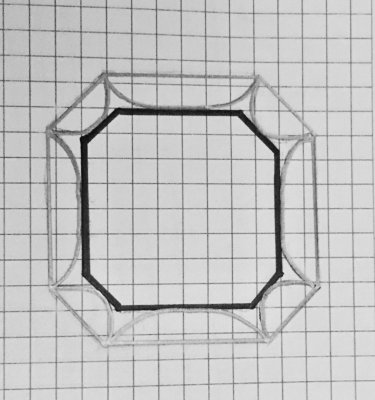
I give Caysie all of the credit. I have loved her Casablanca ring since I first saw it and when I approached Caysie with the question if it would be possible to do it with an asscher she absolutely SQUEALED - lol!! She said she'd been wanting to do it for YEARS but had never had the chance and was so thrilled I was open to exploring it. This is how I saw it playing out - longer arcs on the sides instead of all of the arcs the same size. The center bezel is darker because we wanted it in rose gold.
Side view:
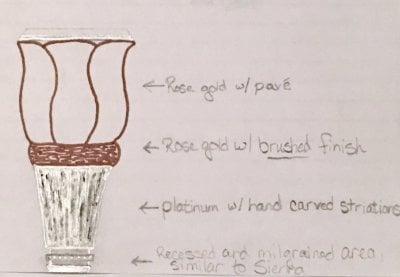
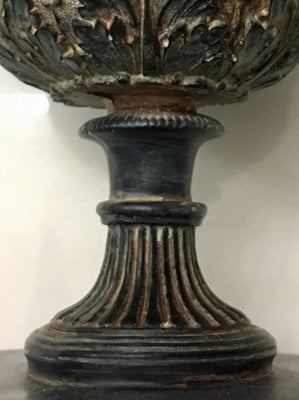
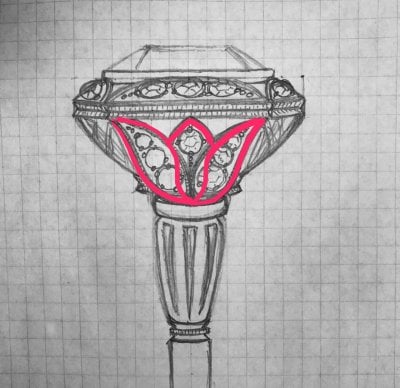
I love flowers, in general, and tulips are my favorite! I wanted to incorporate them in to the design; then it would be like my love was giving me flowers every day . The tulip will be polished rose gold with pave and the cuff underneath it will be brushed rose gold. Then I wanted it to look like a flower stem under it, and asked her to do some hand carving reminiscent of the striations in the photo below; it's a souvenir from a special trip BF and I took. We're going to end the striations with a slight indentation and milgraining.
The gallery:
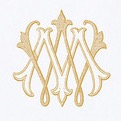
This was the part that stumped me the most. I had NO idea what to do with it. But, at one point months ago, BF and I talked about somehow incorporating the intertwining of our last name initials (M and W) and he absolutely wanted to find a way to make it happen. I actually found this monogram online and used it to create a Mrs. Box for us but never thought of using it in the gallery until, one day, I stumbled across a ring that had some curvy lines in the gallery and a lightbulb went off. When I asked Caysie if it was possible to translate this design in to the gallery she said absolutely (she called it a "stylized monogram" and said she loves doing things like that). We tossed around if it was possible to do one in platinum and the other in rose gold but she said since it was so tiny and delicate that we'd have to stick with all platinum. What we decided to do in the end is make one of the letters knife-edged with milgrain and the other a brushed finish. I was also adamant that the letters intertwine and not just be one on top of the other; I find it very symbolic of marriage. When it came time for CADs her guy forgot to do that at first and had to redo it (she said he was like an angry elf ).
).
Within two days we had sketches. To say I was floored would be an understatement. She took my elementary drawings and created works of art. I almost cried when I saw them. There was only one minor tweak, and that was to the tulip. She drew it much more closed than tulips typically are, whereas I wanted the three distinct petals to show. She revised it and sent it back and I said "Almost, but not quite. Could you make it more like this?" and used the iPhone doodle thingy on the photos app to sketch this; she said "I love this... can I just give it to my CAD guy and ask him to copy it? " Easy peasy.
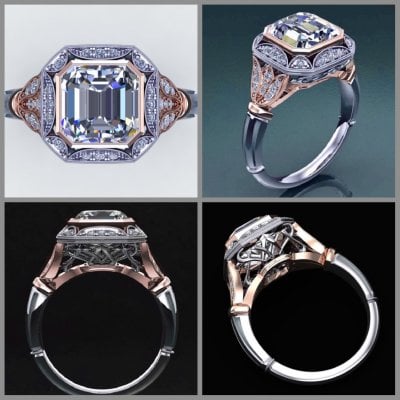
Now that you have the backstory, here are the CADs! Note a couple of things... her imaging software doesn't do asscher stones, so it looks like a wonky emerald cut in the center; it'll be an asscher. Also, the bezel looks thick and high; she promised me that it will be thin and delicate once they're done seating the diamond. Oh, the bezel WILL be rhodium plated to keep the whiteness of the diamond. Lastly, the initial plan was to make the bridge platinum as well but she couldn't decide if it would look better milgrained or with some filigree. My concern was that whatever we did there would compete with the monogram and one day it struck me... why not make the bridge with rose gold? That would eliminate the competition AND totally set off the gallery too! When I asked her her thoughts she loved it, so we changed the CADs. Below are the final versions


We wanted the wax sent to us to make sure it fit okay, as well as check the proportions of it all (again, making sure the center stone wasn't overwhelmed). I could NOT believe how unbelievably delicate and detailed this thing was!!!
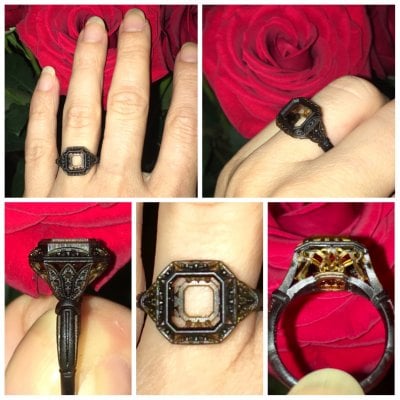
Once we had it in hand, we knew it was perfect and gave her the go-ahead for sending it to production. Now it's a 5-6 week wait until it's all done.
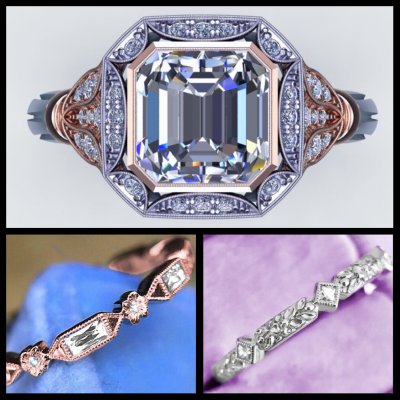
One last photo... a glimpse of how it will look with the wedding bands we ordered for me
Okay, I can't hold out any longer. I had wanted to wait and do a "grand reveal" once my ring was finished but I'm just too excited - lol! Let me start by saying two things: one, this is a LONG post with details on how the design came to be, so if you don't care about that feel free to skip to just the photos, and two, I understand that my style may not resonate for some so if you don't like my design that's okay, but I ask you not to suggest tweaks or anything like that because we LOVE it and have already given our approval for production. Yes, that last request is because I have a tender heart and want to believe that everyone is going to love my ring, no matter how much I tell myself that others opinions don't matter
And, of course, how could I also not say a HUGE thank you to all of you. Seriously. Without all of the existing wisdom and insight I learned from, as well as answers to specific questions I had, I never ever would have ended up with this ring.
And now, on to the show!!!
Designer is CvB. I'll do a full write-up on working with her when I do a SMTB thread.
We initially had some communication problems with her and ended up waiting about five weeks from the time we hired her until we actually officially started on the design. I mention it because, while that was frustrating in some respects, during that time I discovered I have a love of concept doodling and it gave BF and I a chance to hash out exactly how we wanted the ring to look. I knew I wanted a vintage and delicate ring using mixed metal (platinum and rose gold) that also had sentimental aspects to it, and he wanted to make sure the center stone wasn't overwhelmed with other details; putting those pieces together took time but created some special memories for us in the process. Anyway, once Caysie was ready to start the project I was able to send her my drawings and examples of what we wanted and asked her to use her amazing skills to combine it all so it was artsy and flowed. She NAILED it!!!
Here's what I sent her...
Top view:

I give Caysie all of the credit. I have loved her Casablanca ring since I first saw it and when I approached Caysie with the question if it would be possible to do it with an asscher she absolutely SQUEALED - lol!! She said she'd been wanting to do it for YEARS but had never had the chance and was so thrilled I was open to exploring it. This is how I saw it playing out - longer arcs on the sides instead of all of the arcs the same size. The center bezel is darker because we wanted it in rose gold.
Side view:

I love flowers, in general, and tulips are my favorite! I wanted to incorporate them in to the design; then it would be like my love was giving me flowers every day

The gallery:

This was the part that stumped me the most. I had NO idea what to do with it. But, at one point months ago, BF and I talked about somehow incorporating the intertwining of our last name initials (M and W) and he absolutely wanted to find a way to make it happen. I actually found this monogram online and used it to create a Mrs. Box for us but never thought of using it in the gallery until, one day, I stumbled across a ring that had some curvy lines in the gallery and a lightbulb went off. When I asked Caysie if it was possible to translate this design in to the gallery she said absolutely (she called it a "stylized monogram" and said she loves doing things like that). We tossed around if it was possible to do one in platinum and the other in rose gold but she said since it was so tiny and delicate that we'd have to stick with all platinum. What we decided to do in the end is make one of the letters knife-edged with milgrain and the other a brushed finish. I was also adamant that the letters intertwine and not just be one on top of the other; I find it very symbolic of marriage. When it came time for CADs her guy forgot to do that at first and had to redo it (she said he was like an angry elf
Within two days we had sketches. To say I was floored would be an understatement. She took my elementary drawings and created works of art. I almost cried when I saw them. There was only one minor tweak, and that was to the tulip. She drew it much more closed than tulips typically are, whereas I wanted the three distinct petals to show. She revised it and sent it back and I said "Almost, but not quite. Could you make it more like this?" and used the iPhone doodle thingy on the photos app to sketch this; she said "I love this... can I just give it to my CAD guy and ask him to copy it?

Now that you have the backstory, here are the CADs! Note a couple of things... her imaging software doesn't do asscher stones, so it looks like a wonky emerald cut in the center; it'll be an asscher. Also, the bezel looks thick and high; she promised me that it will be thin and delicate once they're done seating the diamond. Oh, the bezel WILL be rhodium plated to keep the whiteness of the diamond. Lastly, the initial plan was to make the bridge platinum as well but she couldn't decide if it would look better milgrained or with some filigree. My concern was that whatever we did there would compete with the monogram and one day it struck me... why not make the bridge with rose gold? That would eliminate the competition AND totally set off the gallery too! When I asked her her thoughts she loved it, so we changed the CADs. Below are the final versions

We wanted the wax sent to us to make sure it fit okay, as well as check the proportions of it all (again, making sure the center stone wasn't overwhelmed). I could NOT believe how unbelievably delicate and detailed this thing was!!!

Once we had it in hand, we knew it was perfect and gave her the go-ahead for sending it to production. Now it's a 5-6 week wait until it's all done.
One last photo... a glimpse of how it will look with the wedding bands we ordered for me





300x240.png)