shape
carat
color
clarity

#JOTW A 5ct OEC Finds a New Home and Some TLC

I love the detailed story of your recut process, and I think it is very special that you got to see the diamond in each stage as it was being recut, talk to your lapidary artist, and have such intricate input into the final result! And to do it all in one day while you were hanging out and checking in on the magic... it's the ultimate adventure!! If Disney had a diamond theme park! :mrgreen2:

Few questions...

  • What did you do in between each stage? Were you checking out jewelry, wandering around, working?
  • Did you take photos of the "in-between" phases of the diamond?


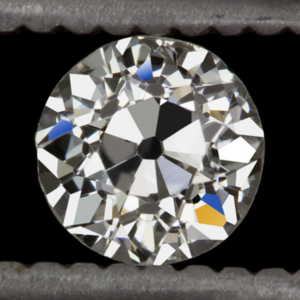
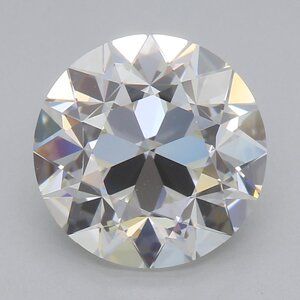
IMO this is the round petal or "bubbly" flower pattern. Very few OECs have the cut or symmetry to achieve this. You can see it with a tad more rounding of the petals here:

1611202528331.png

The "bubbly" or round petal flower pattern is similar in cut to yours, but with a smaller table so it halts the petals before they elongate.

I think of these as the pinwheel pattern which is more typical of early OECs or somewhat disorganized OECs, and some OMCs. You can see the facets under the table don't look like a flower at all, there is no tapering or inconsistent tapering before the table ends. .
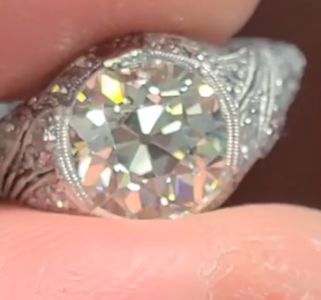
1611202068002.png

1611201483415.png

@Polyhex Thank you, thank you, thank you!!! Your photos and descriptions of the different styles are far better than mine. I know there can be some strong feelings about how these different flavors are named, and I'm so glad you've sorted it out for us. :)

That photo of your OEC is just fantastic! :love::love::love: Do you have a thread on it?

I'd heard the "bubbly" term before but hadn't been able to fit it to a particular style. I'm going to bring that photo up again because it's very close to how our OEC looked before the recut. It's also going to help explain what we were aiming to do in Stage 3 of the recut.
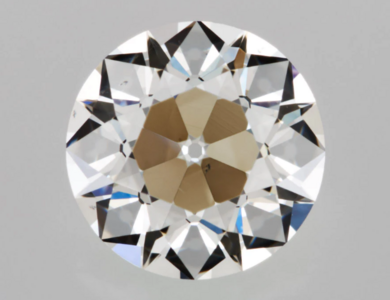
CER 1.061 H VS2.png

You can see the lowers are cut so they are just peeking out from under the table and they do start to create a flower. This diamond is a precision cut so all eight lowers are cut to exactly the same length within 1%. Our OEC had a 5% variation in lower half length so we had a couple that looked like this, a couple that stuck out a little more, and four that were too short to be seen.

Interestingly if you were to tilt the top of this diamond away from you, a 3D effect would expose more of the top lowers and hide the bottom lowers. You would see a much stronger flower at the top, but none at at the bottom. So if you rock the diamond back and forth the flower pattern gets weaker and then stronger, and changes position. This effect can be almost mesmerizing and very beautiful.

Our doomed Plan A in Stage 2 was to open up the table exposing more of those lower half facets and thus create a stronger flower. Stage 3 was to slightly increase the length of the two shortest lowers to reduce our 5% variation and make sure all eight of them extended out under the table. We all thought this stage would be far the easiest of the three stages. Turns out we were wrong!
 
I love the detailed story of your recut process, and I think it is very special that you got to see the diamond in each stage as it was being recut, talk to your lapidary artist, and have such intricate input into the final result! And to do it all in one day while you were hanging out and checking in on the magic... it's the ultimate adventure!! If Disney had a diamond theme park! :mrgreen2:

Few questions...

  • What did you do in between each stage? Were you checking out jewelry, wandering around, working?
  • Did you take photos of the "in-between" phases of the diamond?

It was a great adventure, and we did have a very enjoyable day. However it didn't all get finished that day. Plan A hadn't worked out as well as we hoped, the flower petal pattern was a little stronger but still not enough to be seen by eye. To achieve this David and I had to come up with Plan B.

I completely forgot to take photos during the stages, but it wasn't really necessary. For example once our cutter finished work on the crown we never touched it again. It has stayed exactly as it is now.

This all happened during the pandemic, and before LA became such a hot spot. We did do a lot of masked wandering around and window shopping but we never ventured inside. Fortunately outdoor dining was still permitted so we had a very long lunch at a place that actually spaced their tables well apart. =)2

Wow so fascinating! Thanks for letting us be part of this journey and learn from you! And of course, a stunning ring!

Thank you so much. I'm so happy you like the ring.

I'm really enjoying reading your story. Could you speak to how you got insurance for the recut?

We didn't have our own insurance for the recut. We did have a talk with David about risk, and I asked in his experience what was the risk of anything bad happening, one in hundred, or one in a thousand? He said it was more like one in a thousand. That was reassuring, and given we bought the diamond from David we felt he wouldn't say that unless he was very confident we'd be OK.

When we first met with the cutter he put our diamond on a machine I think was called a polariscope. It measures the stresses that are trapped inside the diamond, the higher the stress, the more risk. He let us view our stone in the machine and showed us how it had a fairly low stress level, and it would be OK to proceed. He also put a piece of rough on the machine and showed us how it was absolutely filled with stress. He had declined to cut that piece of rough. :eek-2:
 
Thank you for the info! That is pretty cool that the level of stress in a diamond can be measured.
 
  • Like
Reactions: prs
To cut the story short, David kindly put our OEC in a temporary setting so DW could wear it for a few days for evaluation. It didn't take very long before she told me she wasn't going to be wearing the GIA cert on her finger, so to heck with the "Old European" designation. I had promised her a flower petal pattern, and that's what she wanted. :love:

By this point in the process David K had become a flower petal pattern expert, so when I called him we both agreed on exactly what needed to be done. Three weeks later our new plan was executed to perfection, and DW was a very, very happy lady! We opened a nice bottle of wine that night. :love::love::love:

Lastly a big shout out to Amy and David, without them none of this would have been possible!
 
Beautiful story and the love between you and your wife is obvious! ❤️ DK and Amy are great! They’ve done several pieces for me as well! ❤️ Hope your wife continues to wear it and see the love In it everyday. Will she wear a band with it? If so, I’d love to see more pics.
 
Beautiful story and the love between you and your wife is obvious! ❤️ DK and Amy are great! They’ve done several pieces for me as well! ❤️ Hope your wife continues to wear it and see the love In it everyday. Will she wear a band with it? If so, I’d love to see more pics.

Yes, 40 years of wedded bliss! :mrgreen2:

I agree Amy and DK are definitely good people! Sorry, no band pics, DW isn't a fan of bands.

PS. Where is your wonderful heart emoji coming from? It doesn't seem to be in my list of smilies. :cry2:
 
Would you mind sharing what the final Sarine looked like and the name of your cutter? I'm truly fascinated by the nuts and bolts of your recut process.
 
  • Like
Reactions: prs
Yes, 40 years of wedded bliss! :mrgreen2:
Congratulations to you both on 40 years!
(congratulations on JOTW, too)
 
  • Like
Reactions: prs
So so so beautiful!!!
 
  • Like
Reactions: prs
Congratulations to you both on 40 years!
(congratulations on JOTW, too)

Thank you! I have long admired your extraordinarily talented setting design skills. :)

So so so beautiful!!!

Thanks a lot @Mreader!

Please join me in congratulating @prs on 40 years of marriage and the Jewel of the Week! :kiss2:


Thank you so much Kayti!!!

Wow JOTW, it's an honor to be included in such exalted company! :dance::dance::dance:
 
This thread had been getting a little long back in January, and I thought it best to wrap things up before it got too bogged down in detail. You may recall our cutter did a fabulous job on the girdle and crown facets of our diamond. The eight crown bezel facet angles varied from 35.6 to 38.4° and just to complicate things the high and low angles were right next to each other. The easy way way would have been to revert to uniformity and shave all eight angles down to 35.6°, then all eight sets of facets could be cut in exactly the same way. However we wanted to keep that original wonkiness, and we also wanted the star facets aligned with the table. Our master craftsman had to do it all the hard way. That's what he did, and it turned out darn near perfect!

Our plan had been to do the rehab in three stages; first the girdle, then the crown, and finally make a small adjustment to the pavilion to achieve DW's desired flower petal pattern. We thought the pavilion was going to be the easiest part of the rehab, but in fact it was by far the most difficult. It turned out that cutting the lower half facets with the accuracy required to create a flower petal pattern is not so simple! It requires superior equipment and precision. David actually had to go find us a new cutter with those capabilities. Fortunately we were able to rescue the situation and everything ended happily ever after. :)

The reason I bring this up now is there has recently been discussion in RT about possible OEC recuts. I didn't have time to go into any detail on our difficulties with the pavilion recut earlier in the thread. If anyone would like more info, let me know and I'll be happy to share.
 
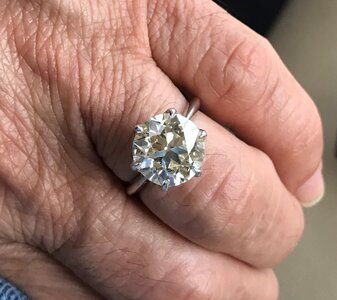
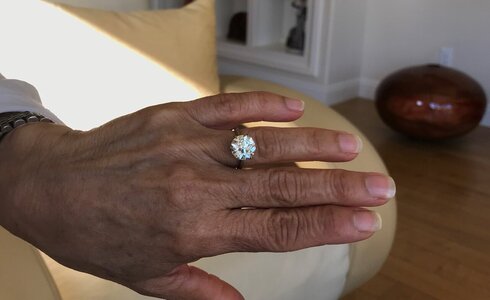
A few more photos;

5.05ct OEC 111.jpg

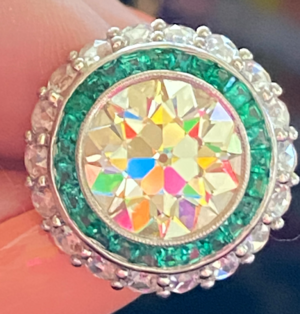
This is what DW meant by a visible flower petal pattern. She wanted to be able to see it without the aid of magnification.

5.05ct OEC 112.jpg

I think this is why it's called the flower petal pattern. =)2

5.05ct OEC 113.jpg

5.05ct OEC 114.jpg
 
Such a stunning ring. @prs thanks for chronicling your process. I anticipate that this thread will be used as a roadmap for many.
 
  • Like
Reactions: prs
I am late to the party, but loved reading your story! Fascinating how the diamond was recut! Thank you for sharing all the details, and congratulations on your spectacular ring!!
 
  • Like
Reactions: prs
Oh my goodness, what a lovely project and wonderful series of posts! I absolutely love everything about this. Great husband, great stone, great process, lovely hand and ring! I absolutely love warm diamonds, and I’m about to set my new (to me) M antique OEC. The flower pattern was important to me, too!
 
What a stunning ring! Very elegant and classic. Great size and stunning cut. Congrats!!
 
  • Like
Reactions: prs
This ring is amazing. Thanks for sharing and congrats on 40 fabulous years together.
 
My goodness, how did I miss this...really enjoyed reading about your journey! The diamond and ring are absolutely gorgeous and looks amazing on your wife's hand!!!
 
  • Like
Reactions: prs
This is an absolutely amazing story and a STUNNING diamond and I personally would love more information about everything - surely if there's a place where lots of detail is a good thing it's this forum? I'm absolutely sure there will be people who would benefit from all the successes and challenges of going through this process and anything that makes their journey easier must be a good thing - so thank you so much for already sharing what you have!!!

Congratulations on your anniversary, and again that diamond and setting are just stunning.
 
  • Like
Reactions: prs
I am late to the party, but loved reading your story! Fascinating how the diamond was recut! Thank you for sharing all the details, and congratulations on your spectacular ring!!
Glad to share our little adventure. The recut did have its nervous moments, but everything turned out great in the end.=)2

Oh my goodness, what a lovely project and wonderful series of posts! I absolutely love everything about this. Great husband, great stone, great process, lovely hand and ring! I absolutely love warm diamonds, and I’m about to set my new (to me) M antique OEC. The flower pattern was important to me, too!
Thank you, I'm sure your new setting will be fabulous! I agree warm diamonds are a best kept secret, and tremendous value for money!

What a stunning ring! Very elegant and classic. Great size and stunning cut. Congrats!!
Thank you @Acinom Your beautiful OEC was part of our inspiration!

This ring is amazing. Thanks for sharing and congrats on 40 fabulous years together.
Thank you, and yes, a fabulous 40 years with never a dull moment! :mrgreen2:

My goodness, how did I miss this...really enjoyed reading about your journey! The diamond and ring are absolutely gorgeous and looks amazing on your wife's hand!!!
I was a little concerned DW might find it too conspicuous to wear every day. Boy was I wrong, she hardly ever takes it off!!! ;)2

This is an absolutely amazing story and a STUNNING diamond and I personally would love more information about everything - surely if there's a place where lots of detail is a good thing it's this forum? I'm absolutely sure there will be people who would benefit from all the successes and challenges of going through this process and anything that makes their journey easier must be a good thing - so thank you so much for already sharing what you have!!!

Congratulations on your anniversary, and again that diamond and setting are just stunning.
Thank you so much for your very kind words! I promise to put my thoughts together on the rest of the story and share it with you soon.
 
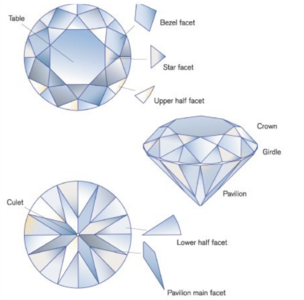
Hopefully this won't be too boring, but before I continue with more info on stage three of the rehab, I’m going to share some of my thoughts on what it is that creates the flower petal pattern. This explains why we had to have a stage 3. DW had fallen in love with the flower petal pattern, but the stones we were being shown didn’t have it. I was worried we wouldn’t be able to find her diamond before our anniversary, so I decided to find out how this pattern was created. Maybe it would be possible to turn an ugly duckling into a swan? =)2 It took me ages to figure this out. When I first began my research I had never even heard of the Lower Half facets, and had no idea they were of vital importance in determining the facet pattern under the table. I shared this picture earlier in the thread, and it does a great job of showing where the Lower Half facets are located on the pavilion.

Facet Diagram 2.png

At bottom left you can see how the pavilion facets would look face up with the crown removed. The eight Pavilion Main facets run from the girdle to the culet and the sixteen Lower Half facets start at the girdle but only run part way down the pavilion. How far they run down the pavilion is measured as a percentage of the total length to the culet. For MRBs this length is usually between 75% and 80%. For OECs they are always shorter than that.

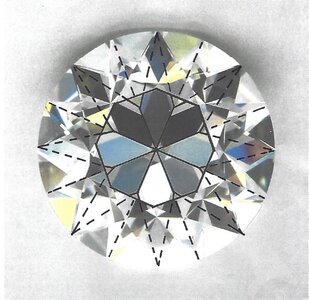
It’s this Lower Half facet length relative to the Table that determines the facet pattern under the table. I already used this photo borrowed from August Vintage to show my preferred crown facet pattern with the star facets aligned to the table.

AVR 2.064ct 1.jpg

The pavilion facet pattern is more difficult because most of it is hidden by the crown facets. Here is the same photo with the hidden pavilion facets added in dotted lines.

AVR 2.064ct 1E.jpg

I've removed the dotted lines and this is what you actually see if the Lower Half facets are long enough for their meet points to extend out under the table and create the flower petal pattern.

AVR 2.064ct 1F.jpg

If the Lowers are cut so they just reach the edge of the table you won’t see the flower pattern face up, but you will see a partial as the diamond is tilted. Here’s a LINK to a video that shows this 3D tilt effect.

If the Lowers are cut too short to extend under the table, all you will see is the eight Pavilion Main facets, creating the pinwheel pattern. This was the pattern of most of the OECs we were shown.

So in any OEC recut the facet pattern under the table is determined by the length of the Lower Half facets. Personal preference determines the pattern you want, but to get it you have to tell your cutter exactly how to cut those Lower Half facets. I had a pretty good idea of what we needed to do to the pavilion of DW’s diamond to achieve the flower, and that was what stage three was all about.

@prs - never have I ever understood the cut of an OEC more. And on the first read through too! Awesome descriptions with wonderful diagrams. I feel like this needs to be pulled out into its own thread or added to some sort of main OEC knowledge thread or something.
 
  • Like
Reactions: prs
I don't know how I missed this thread but I read the whole thing on the edge of my seat dying to see what would happen next with this magnificent stone. THis was a masterclass on OECs and I'm in sparkle-geek heaven. Congratulations!!
 
@prs - never have I ever understood the cut of an OEC more. And on the first read through too! Awesome descriptions with wonderful diagrams. I feel like this needs to be pulled out into its own thread or added to some sort of main OEC knowledge thread or something.

Great idea!
 
Last edited:
I don't know how I missed this thread but I read the whole thing on the edge of my seat dying to see what would happen next with this magnificent stone. THis was a masterclass on OECs and I'm in sparkle-geek heaven. Congratulations!!

Thank you so much for the kind words. I hope I haven't kept you on the edge of your seat for too long!
 
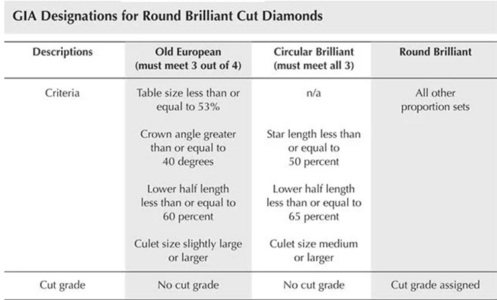
GIA have certain cut criteria they use to define the three types of round diamonds.

GIA Cut Criteria.png

DW wanted her diamond to be classified as an Old European, and to get that designation GIA requires a “Lower half length less than or equal to 60%”. We did have some leeway because GIA would round down a 62% length to 60%. We also knew the more those lowers extended beyond the table, the stronger the flower petal pattern. The Sarine scan after stage one showed the lowers varying in length from 56.8 to 61.7% with an average of 59.0%. The plan for stage three was simply to lengthen the shorter lowers in turn to 60-62% making sure the average did not exceed 62%.

Our cutter had done a fantastic job on the first two stages and and we had only lost 10 points. We had every reason to expect the same great job on stage three. The experts we had talked to before the purchase had told us that lengthening the Lowers shouldn’t be difficult, and we would likely only lose a point or two in the process.

To our surprise our cutter really struggled with stage three, and rather than two we actually lost six points. To make matters worse DW couldn’t see her flower petal pattern! We had expected to send the diamond off to GIA when the recut was complete, but fortunately DW put a stop to that. This diamond didn’t meet her expectations and she needed time to see if she could live with the stone as is, or if we could figure out a Plan B. To complicate matters, at 5.06ct the diamond was now perilously close to the 4.99ct major price decrease. David kindly had the diamond set in a temporary setting so we could take it home and decide what we wanted to do.

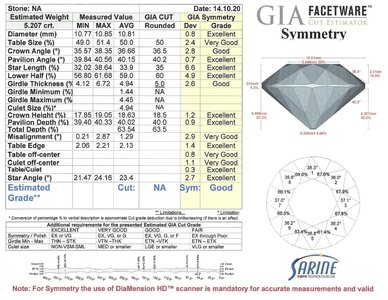
It didn’t take me long to find out why our cutter had such a struggle. All along we assumed the Sarine scans were highly accurate, after all they were printing out the lengths to two decimal places! Here’s a copy of the scan after we stabilized the girdle in stage one.

Sarine 2020-10-14 Stage 1 5.20ct 1.jpg

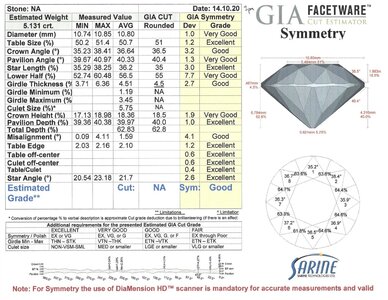
And here’s a copy of the scan after the crown rehab in stage two.

Sarine 2020-10-14 Stage 2 5.12ct 1.jpg

There’s so much to look at in these scans, it’s easy to lose focus on the few numbers that really matter. We were so busy admiring our gorgeous diamond after stage two that I didn’t take the time to carefully study the new scan. If I’d had my wits about me I would have put a hold on stage three right there! Our cutter didn’t touch the pavilion in stage two, so all the pavilion readings should have stayed the same, but they didn’t!!!!

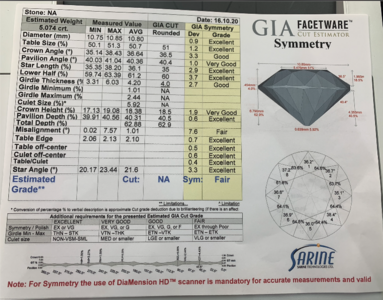
The pavilion angles hardly changed, but look closely at the Lower half lengths. They changed from 56.80 / 61.68, avg 59.0% to 52.74 / 60.48, avg 56.5%. There is no way those numbers could be correct, the readings were off by a mile! DW had also kept copies of the scans with the pavilion facet diagrams so I checked to see how much each individual length had changed. The worst one decreased from 58.4 to 52.7%, a change of almost 6%. No wonder our cutter struggled. There’s no way he could accurately cut those Lowers when he was working with such inaccurate measurements. I suspect after first lengthening the facets, he had to go back and shorten them at least once. That’s why we lost the six points. It’s likely a minor miracle he ended up as good as he did. Here’s a copy of his final scan.

Sarine 2020-10-16 Stage 3 5.06ct 1.png

The Lowers measured 59.74 to 63.39, average 61.2%, not far from what we wanted in stage three. Our problem of course is we didn’t know how accurate these numbers were. If they too were off by a mile we were back to square one!

It was time to Google the Internet and find out what it had to say about the accuracy of Sarine machines. Well the answer is not much, Sarine do a great job of keeping secret their proprietary information. The only thing I could find was a PriceScope thread from 2005 that seems to say all Sarine machines are not created equal. To accurately measure closely aligned facets you need the more expensive, well calibrated, high end, super-duper model Sarine. I called David and he was pretty sure our cutter’s Sarine was not a super-duper.

David and I discussed our next step and agreed, somewhat reluctantly, our best bet was to find a new cutter with a super-duper Sarine. It took a week or two before he found our new guy, and he was LA based too! David invited us down to meet with him, and the next phase of our recut adventure had begun!
 
Last edited:
GIA have certain cut criteria they use to define the three types of round diamonds.

GIA Cut Criteria.png

DW wanted her diamond to be classified as an Old European, and to get that designation GIA requires a “Lower half length less than or equal to 60%”. We did have some leeway because GIA would round down a 62% length to 60%. We also knew the more those lowers extended beyond the table, the stronger the flower petal pattern. The Sarine scan after stage one showed the lowers varying in length from 56.8 to 61.7% with an average of 59.0%. The plan for stage three was simply to lengthen the shorter lowers in turn to 60-62% making sure the average did not exceed 62%.

Our cutter had done a fantastic job on the first two stages and and we had only lost 10 points. We had every reason to expect the same great job on stage three. The experts we had talked to before the purchase had told us that lengthening the Lowers shouldn’t be difficult, and we would likely only lose a point or two in the process.

To our surprise our cutter really struggled with stage three, and rather than two we actually lost six points. To make matters worse DW couldn’t see her flower petal pattern! We had expected to send the diamond off to GIA when the recut was complete, but fortunately DW put a stop to that. This diamond didn’t meet her expectations and she needed time to see if she could live with the stone as is, or if we could figure out a Plan B. To complicate matters, at 5.06ct the diamond was now perilously close to the 4.99ct major price decrease. David kindly had the diamond set in a temporary setting so we could take it home and decide what we wanted to do.

It didn’t take me long to find out why our cutter had such a struggle. All along we assumed the Sarine scans were highly accurate, after all they were printing out the lengths to two decimal places! Here’s a copy of the scan after we stabilized the girdle in stage one.

Sarine 2020-10-14 Stage 1 5.20ct 1.jpg

And here’s a copy of the scan after the crown rehab in stage two.

Sarine 2020-10-14 Stage 2 5.12ct 1.jpg

There’s so much to look at in these scans, it’s easy to lose focus on the few numbers that really matter. We were so busy admiring our gorgeous diamond after stage two that I didn’t take the time to carefully study the new scan. If I’d had my wits about me I would have put a hold on stage three right there! Our cutter didn’t touch the pavilion in stage two, so all the pavilion readings should have stayed the same, but they didn’t!!!!

The pavilion angles hardly changed, but look closely at the Lower half lengths. They changed from 56.80 / 61.68, avg 59.0% to 52.74 / 60.48, avg 56.5%. There is no way those numbers could be correct, the readings were off by a mile! DW had also kept copies of the scans with the pavilion facet diagrams so I checked to see how much each individual length had changed. The worst one decreased from 58.4 to 52.7%, a change of almost 6%. No wonder our cutter struggled. There’s no way he could accurately cut those Lowers when he was working with such inaccurate measurements. I suspect after first lengthening the facets, he had to go back and shorten them at least once. That’s why we lost the six points. It’s likely a minor miracle he ended up as good as he did. Here’s a copy of his final scan.

Sarine 2020-10-16 Stage 3 5.06ct 1.png

The Lowers measured 59.74 to 63.39, average 61.2%, not far from what we wanted in stage three. Our problem of course is we didn’t know how accurate these numbers were. If they too were off by a mile we were back to square one!

It was time to Google the Internet and find out what it had to say about the accuracy of Sarine machines. Well the answer is not much, Sarine do a great job of keeping secret their proprietary information. The only thing I could find was a PriceScope thread from 2005 that seems to say all Sarine machines are not created equal. To accurately measure closely aligned facets you need the more expensive, well calibrated, high end, super-duper model Sarine. I called David and he was pretty sure our cutter’s Sarine was not a super-duper.

David and I discussed our next step and agreed, somewhat reluctantly, our best bet was to find a new cutter with a super-duper Sarine. It took a week or two before he found our new guy, and he was LA based too! David invited us down to meet with him, and the next phase of our recut adventure had begun!

Gosh I'm on the edge of my seat! This stage must have been so painful to have lost so many points comparatively and to have not achieved what you wanted... Can't wait for the next installment!
 
  • Like
Reactions: prs
I’ve been reading this on the edge of my seat. Popcorn please!
 
  • Like
Reactions: prs
Gosh I'm on the edge of my seat! This stage must have been so painful to have lost so many points comparatively and to have not achieved what you wanted... Can't wait for the next installment!


I’ve been reading this on the edge of my seat. Popcorn please!

The diamond had its share of wear and tear over its long life. We already knew it was sparkly, but after the crown rehab it turned into a fireball. Cleaning up those facets not only gave us the crown facet pattern DW wanted, it also restored all the diamond's original beauty. DW was euphoric after stage 2 so yes, the stage 3 result was quite a let down.

Fortunately David did find us the right guy for phase two of our adventure and everything turned out fine. A very happy ending indeed!

We actually learned a whole lot more from phase two that I hope to share soon. We are visiting wine country right now, so It'll likely be the weekend before I can post more. Please get off the edge of your seats and put the popcorn on hold. :-)
 
GET 3 FREE HCA RESULTS JOIN THE FORUM. ASK FOR HELP
Top