shape
carat
color
clarity

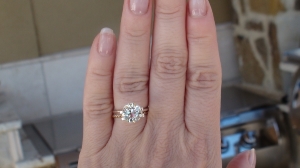
#JOTW Homemade E-ring... 2mm ok? What about prongs?

No advice, but just wanted to say how awesome this is! This is going to be an heirloom, for sure. :appl:
 
Undercover 999

Is there any reason you're not just finishing your CNC waxes for casting? - (surely all wax melts)? Is cnc very difficult to finish? Could you CNC a castable wax? I'm not sure that making a rubber mold is necessary - you might be doing more work than you have to. (Unless you want to make your fiance 100 rings, all the same.)

I can see you're definitely making progress!
 
HopeDream|1322026822|3067451 said:
Undercover 999

Is there any reason you're not just finishing your CNC waxes for casting? - (surely all wax melts)? Is cnc very difficult to finish? Could you CNC a castable wax? I'm not sure that making a rubber mold is necessary - you might be doing more work than you have to. (Unless you want to make your fiance 100 rings, all the same.)

I can see you're definitely making progress!

In theory yes, I could go right from the machine to casting. In practice its actually more work.

For one it takes about 12 hours of machining to make the half-models I posted pictures of. Part of that is due to the fact that I built that CNC machine myself, so its not as fast or powerful as professional mills. But also I tried to minimize the finishing by making the mill cut as precisely as possible - it takes 2000 passes across the ring and repeats that in 3 directions.

The bigger issue is that my machine is only 3 axis so it can't cut both sides of the ring, thus why my current waxes only mold half the ring (this is also why my prongs are "webbed" in the mold). To get the other side I'd have to remove the wax and flip it over, but my machine would lose track of where it was cutting if I removed the wax. It'd be quite tough for me to get the cutter properly realigned.

The rubber molds are easy to make, though the wax injection is kinda difficult without a nice wax injector. Still, its the best option, I think, cuz it lets me have lots of screwups and practice runs without waiting 12+ hours for the machine to crank out another wax.

I finished my new rubber molds last night so this evening I can try making more waxes. I think I'll heat the rubber first this time too to help the wax stay liquid.

I also have some of this: http://www.ottofrei.com/store/product.php?productid=15440&cat=2806&page=1 so I'll make another test run this weekend which will start to look like a real ring.
 
It is very interesting to watch your progress! Remember to keep the workshop well ventilated while casting.

Have you checked if your fiancee has nickle sensitivity? It is more common than people imagine, which is why nickle white gold is banned in Europe and why nickle was voted Allergen of the Year in 2008 by the American Contact Dermatitis Society.
 
Seriously sexy. That is all.

One of the best things about my DH, is that he can do anything. There is nothing sexier than a manly man! ;))
 
Lady_Disdain|1322106645|3068086 said:
It is very interesting to watch your progress! Remember to keep the workshop well ventilated while casting.

Have you checked if your fiancee has nickle sensitivity? It is more common than people imagine, which is why nickle white gold is banned in Europe and why nickle was voted Allergen of the Year in 2008 by the American Contact Dermatitis Society.

I have no idea... thats why I'm going to use palladium white gold instead. The nickel-based grain I linked to is just for more practice before The Big Show. I'm a little concerned about the higher temperatures but what can you do, I'll just have to figure it out.

Good tip about ventilation. Thankfully my intended sleeps heavily and didn't hear the 2am smoke alarm last night. :shock: :D
 
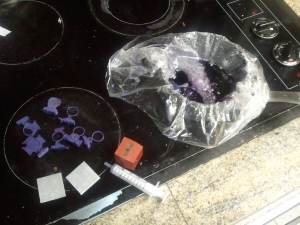
No real "news" for today. But here is a shot of my high tech wax injection laboratory / kitchen:

wax1.jpg

The red rubber mold is the harder shore 60A rubber I mentioned - it works MUCH better. In truth I wouldn't hesitate to go even stiffer than 60A... but this will do.

I just suck up wax from the double boiler (pot of water with an oven bag in it) with my injector (baby medicine syringe form Walgreens) and inject it into the mold. I know the mold is full when a) wax squirts out from the seams and covers the kitchen and b) the syringe solidifies into a solid mass that requires 10 minutes of swearing to clean.

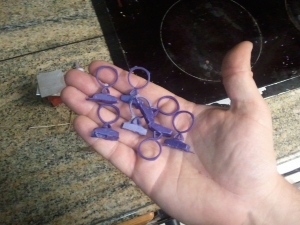
The good news is that I have a supply of waxes that will last me for a while... or at least until I make my final models with the revised sprues etc etc. [If there was a smiley shaped like a beer I'd put it right here]

wax2.jpg
 
Awesome pics!

I was discussing your project with my fiance and he suggested that instead of trying to cut out a positive image of your ring with your CNC machine, you could have it cut out the negative image of your ring, basically have it cut you a ring mold out of metal/heat resistant plastic, and then pour wax into the cut mold to shape the wax - if you had 2 pegs on one side of the mold and holes for the pegs on the other side of the mold it would line it up perfectly. You could even pre-cad the sprue onto the ring, and have it as part of the shape of your mold.
I'm not sure it if this strategy would get you ahead or provide a more accurate model of the ring you are trying to create, but it's a thought.

If only makerbots could do really detailed 3D printing!

The youtube casting prcedure 1-17 clips will give you a good idea of the investing process and brief use of a casting machine - note the heavy use of a vaccuum chamber to eliminate air bubbles : http://www.youtube.com/watch?v=EpHDYpgP9Fw

This is also a nice and instructive series of clips on the casting process - I think they use a vaccuum caster: http://www.youtube.com/watch?v=C7lrNBOtgLY

For the casting itself you might want to see if you can use someone else's shop. These set-ups get ridiculously expensive :http://www.master-machines.com/melting_casting_machinery.htm . You could still be doing all the work, I just wouldn't want you to shell out for a set-up you'd only use once (or twice?).
 
HopeDream|1322191670|3068502 said:
Awesome pics!

I was discussing your project with my fiance and he suggested that instead of trying to cut out a positive image of your ring with your CNC machine, you could have it cut out the negative image of your ring, basically have it cut you a ring mold out of metal/heat resistant plastic, and then pour wax into the cut mold to shape the wax - if you had 2 pegs on one side of the mold and holes for the pegs on the other side of the mold it would line it up perfectly. You could even pre-cad the sprue onto the ring, and have it as part of the shape of your mold.
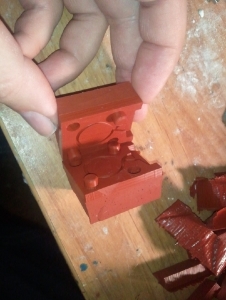
Oops, I guess I never posted a good pictures of the way I'm doing things presently... I'll fix that now. I was trying hard not to bore everyone with details but now since you asked..............

I'm not really following you on why you think CNC'ing a negative mold would be better. Its true that I need to end up with a negative mold in order to make waxes for casting, but the negative needs to be very flexible so the wax can be removed; rubber definitely beats plastic or metal. Rubber can't be machined, however, thus why I'm machining hard wax and then making rubber molds afterwards.

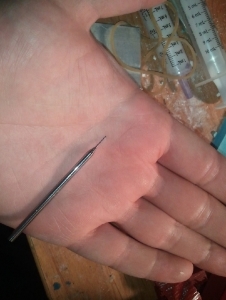
Also, negative molds are a bad choice for cutting with a CNC machine - the reason being that the cutter has to be small enough to fit inside all of the features you're cutting (since they would be cut as channels in the wax). The 1/32" cutter (0.8mm) I'm using would be too large to cut all of the features in my design when cutting a negative (its true that all my major features are bigger than 1mm, but you need to account for all the rounded edges and such - 0.8mm is WAY too big). Sadly 1/32", IMO, is really the smallest practical size; any smaller and I'd have to slow the mill down in order to avoid breaking the cutter. 1/32" is super small already, mind you, and is quite fragile:

WP_000826.jpg

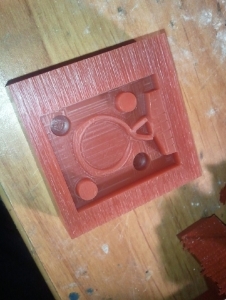
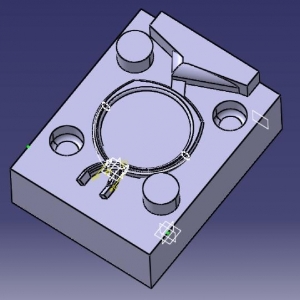
However, what you say about pins and holes is exactly what I've already done. You could see it partially on my first post, but here is a shot of the finished wax; you can see the alignment pins and holes, as well as the "cup" for holding the molten metal attached to the prongs (this is what I need to reverse so it feeds the bottom half of the ring via a sprue instead):

WP_000827.jpg

The rubbers I just cast by pouring liquid rubber onto the CNC'd wax and making two copies - the pins and holes are mirrored and so the copies fit together:

WP_000828.jpg

For injecting wax I made a little polyester plug that sits in the cup-thing and has a hole for the nozzle of the syringe:

WP_000829.jpg

HopeDream|1322191670|3068502 said:
The youtube casting prcedure 1-17 clips will give you a good idea of the investing process and brief use of a casting machine - note the heavy use of a vaccuum chamber to eliminate air bubbles : http://www.youtube.com/watch?v=EpHDYpgP9Fw

This is also a nice and instructive series of clips on the casting process - I think they use a vaccuum caster: http://www.youtube.com/watch?v=C7lrNBOtgLY

For the casting itself you might want to see if you can use someone else's shop. These set-ups get ridiculously expensive :http://www.master-machines.com/melting_casting_machinery.htm . You could still be doing all the work, I just wouldn't want you to shell out for a set-up you'd only use once (or twice?).
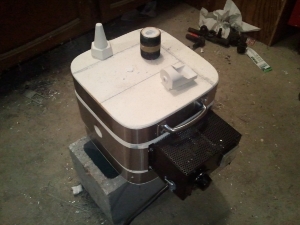
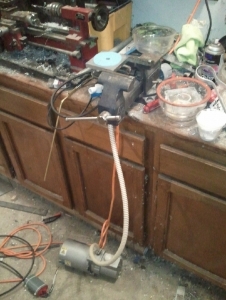
Believe me, I've probably watched every casting video on the internet at this point. My garage is well stocked and my junk drawer even more so - what I lack in equipment I can surely make/scrounge/improvise.

Here is my little bitty kiln for baking the investment and burning out waxes - this I had to buy, but it was a steal for only $300:

WP_000830.jpg

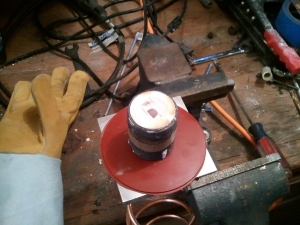
And here is my vacuum casting setup (please ignore the mess). You can see the vacuum chamber (actually an old vacuum dessicator) that I use for degassing investment on the right. I made a little, uh, "platform" out of some scrap aluminum and attached a brass plumbing fitting in the center for pulling a vacuum through the flask - thats what you see held in the bench vice and my trusty old vacuum pump is on the floor. The baby blue circle on it is some rubber I cast up to act as a gasket... I didn't use high temp stuff for this but its holding up surprisingly well!

WP_000831.jpg

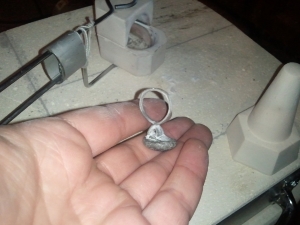
I tried to cast a ring using my nice white casting grain today, but sadly Mr. Otto Frei didn't bother to tell me what the melting point of the alloy was. I tried to melt it with a simple MAPP/air torch and it wasn't hot enough... thats fine, as I'd surely need a bigger torch for my white gold anyway, but I hadn't yet bothered to dust off my oxy/propane torch. I'll stop at the store tomorrow to get some oxygen bottles and then I'll be in business with the more manly torch. :D
 
Just thought of something - are you taking her ring size into account while doing this project? I only ask because it'd be a shame if you really did every step of this process without help, but then still had to take it into the jeweler to size it properly once you were finished!
 
sonnyjane|1322243444|3068685 said:
Just thought of something - are you taking her ring size into account while doing this project? I only ask because it'd be a shame if you really did every step of this process without help, but then still had to take it into the jeweler to size it properly once you were finished!

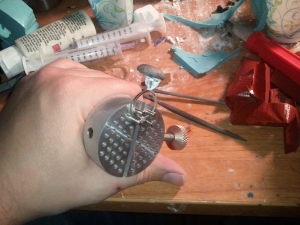
Heehee, yep, I know shes a 6 or a 6.25.
 
I picked up an oxygen tank and, after hours of searching, found my oxy-propane torch in a box of extension cords up in my bedroom... figures.

At first it was a complete comedy of errors. First I couldn't figure out how to hold the lid onto my Burno-style crucibles - the tongs they sell are crap and I had to modify them. Then I couldn't get my torch mixture adjusted properly and I wasted a ton of oxygen just fiddling with it. When, at long last, I was ready to pour I [unbelievably] MISSED and poured molten metal down the side of the flask and melted my rubber vacuum gasket. bang.gif

Annnnyway, take two went better - I salvaged the unmelted parts of my vacuum gasket, reheated my mold, melted a fresh batch of my mystery alloy and poured...

WP_000835.jpg

YAY!

I popped it into a clamp so I could file away some of the oxidation and see how it looked...

WP_000837.jpg

Ultimately I think I'm in good shape. There were some voids in the very lowest section of the ring, I assume is because I'm feeding metal from the "wrong" side and because my flask was only at about 600F when I poured - I understand it should be significantly hotter.

WP_000840.jpgWP_000839.jpg
 
Nice setup!

How about a centrifugal caster? http://www.americanjewelrysupply.com/products/casting/centrifugal2.html
http://www.ajstoolsonline.com/mysto...ine/neycraft-centrifugal-casting-machine.html You wind up the caster and lock the mechanism, You mount the investment flask horozontaly, lined up beside the crucible, heat your metal in the crucilbe with an oxy-acetaline torch, and then when the metal is molten you release the mechanism and the molten metal is spun into the mold.

Hopefully heating to the correct temp, and spruing from the band will help you deal with the porosity issues. If you still have issues after you change your technique, you may have to go to a more formal casting apparatus.

Make sure you take lots of pictures from your journey and make your fiancee a "how I made your ring" journal/scrapbook - I bet She'll love it and love to show it to friends and family.

I'm glad the "ring bite" on your hand is starting to heal.
 
HopeDream|1322291287|3069027 said:
Nice setup!

How about a centrifugal caster? http://www.americanjewelrysupply.com/products/casting/centrifugal2.html
http://www.ajstoolsonline.com/mysto...ine/neycraft-centrifugal-casting-machine.html You wind up the caster and lock the mechanism, You mount the investment flask horozontaly, lined up beside the crucible, heat your metal in the crucilbe with an oxy-acetaline torch, and then when the metal is molten you release the mechanism and the molten metal is spun into the mold.

Hopefully heating to the correct temp, and spruing from the band will help you deal with the porosity issues. If you still have issues after you change your technique, you may have to go to a more formal casting apparatus.

Make sure you take lots of pictures from your journey and make your fiancee a "how I made your ring" journal/scrapbook - I bet She'll love it and love to show it to friends and family.

I'm glad the "ring bite" on your hand is starting to heal.

Great minds must think alike! Actually my plan all along was to build a centrifugal caster and then at the last minute I went with the vacuum because it seemed like I had all the stuff on hand (and it meant that I wouldn't have to disassemble her bicycle to steal the one-way bearing)... In one of my pictures you can see one of the centrifugal casting crucibles I bought sitting on my kiln.

Started the CNC mill on the new waxes just now. New wax:

newwax.jpg

You've just confirmed my worst fear, btw: with all the pictures of blinged-out hands on this site I worried you all were scrutinizing my wounds and dirty fingernails... I guess you are, haha. I can't be bothered to clean up before picture time... :oops: :oops: :oops: But thanks, yes, healing nicely.

I'm am taking videos, actually, of every step in the process for her. I figured I would let her enjoy the ring for a while and not mention that it was homemade, and then I can show her the video sometime later. Shes not at all "brand conscious" but I still worry that maybe an engagement thing was just one of those things that a girl really wants to come from a professional... so I figure I'll break the news to her slowly. :?
 
If you do build the centrifugal caster - the scatterguard around the edge and bottom is a must - you don't want molten metal scattered around your shop. Maybe you could do a test run with a fake crucible/mold and some glue/hair gel (slightly viscous liquid) to make sure that everything is spinning and lined up correctly?

I know you've probably seen a milion videos, but I thought this one was quite good : http://www.youtube.com/watch?v=MvOKy3Msa4I

Conversly contact some local highschools - there must be one shopclass with one that you could sneak in and use (I don't want you using a pickaxe to do brain surgery - right tools for the right job and all that). If there is one you can use, bring your own clean crucible http://blog.silverdropsdesigns.com/2011/03/prepping-a-crucible-for-casting/ so you dont get any of their residue in your alloy. I think we used borax flux for silver, I don't know what you'd use for gold.

Love the pics!
 
Is centrifugal casting preferable to vacuum for some reason I'm not aware of?
 
I am not at all handy or mechanically inclined, but I have to say you rock on with your bad self! This is seriously impressive!!!
 
This is an amazing story! I'm glad to hear you have video of the process. You should also copy and paste your entries at Pricescope to make journal. Surely she will appreciate what you've done...seriously, how can she NOT?!?!??!?!?!?!?! :roll:
 
Bling bling bling, got all my bullion!

5g and 1g bars, from left to right: Gold, Palladium, Silver, Zinc, and Copper. Proportions are still TBD; haven't chosen an alloy yet... but no, I'm not using that much copper, that was just the minimum order qty. :)

WP_000855.jpg
 
Another message from the peanut gallery - this is one of THE most riveting threads on PS. What an incredible story it'll make for when you do tell her!!

I know what I'll be doing tonight - watching all those youtube clips to try and make sense of some of it... Thank you so much for sharing this with us Undercover!
 
Big ditto to Yssie! This is the first thread I check when I log into PS!

I am blown away by what you've been able to do so far!
 
Glad you all are enjoying it; I'm sure I'll show her this thread, maybe we'll put a cap on it with her posting here :)

Sadly not much exciting to report, except that I'm getting closer and closer. I've finished my new CNC molds, I remade the waxes with my new wax, and now I'm focusing on cleaning up the waxes. I did decide that my original plan - working only on the finished metal ring rather than the wax - was foolish, given the difficulty I found with cleaning up the nickel alloy test runs.

Also I've been researching the alloy to use. This is more difficult than I was expecting - it seems nowadays that few jewelers make their own alloys and the composition of the commercially available alloys appears to be a trade secret - many alloys are sold under brand names with little info on their proportions. I've found some information, for example this page:

http://www.azom.com/article.aspx?ArticleID=2372
Code:
kt       Gold        Palladium       Silver       Copper      Zinc      Nickel
18        75              20              5
18        75              15             10
18        75              10             15
18        75              10            10.5        3.5         0.1        0.9
18        75             6.4             9.9        5.1         3.5        1.1
18        75              15                        3.0                    7.0
14       58.3             20              6          3           1
14       58.5              5             32.5      20.5         1.4
10       37.5             52             4.9        4.2         1.4

That site first claims to list "gold/palladium alloys" but then later says its listing "white gold"... thats important because NOT all gold/palladium alloys are white. The reason I mention that is because I found an oooooold book from 1919, "The Scientific American Cyclopedia of Formulas" that has this to say:

Code:
kt       Gold        Palladium       Silver       Copper      Zinc      Nickel
18+       80             20              
10        37.5         12.5            23           27

Heres the kicker, for the first alloy that book described it as:
An alloy of palladium 20 parts, gold 80, is white, hard as steel, unchangeable in the air, and can, like the other alloys of palladium, be used for dental purposes.
Sounds pretty good...

But the second alloy it said this about:
Alloys of gold, copper, silver, and palladium have a brownish red color and are as hard as iron. ... The composition used in the Swiss and English watch factories consists of usually of gold 18 parts, copper 13, silver 11, and palladium 8.
This makes me VERY suspicious of palladium gold alloys containing relatively low amounts of palladium and relatively high amounts of copper. The first link may claim that all the alloys listed are "white golds" but in particular the 14kt alloy with copper over 20% and low palladium seeeeems much too similar to the alloy noted as "brownish red" in my old timey book to be a white gold.

So it looks like I need to very careful in choosing my alloy, as all gold-palladium alloys are not created equal.

But!

Thankfully one manufacturer among many did give some clues about the composition of their alloys and the relative whiteness. Hoover and Strong have an 18 and a 14kt palladium white gold alloy available and list some basic composition here:
http://www.hooverandstrong.com/category/Casting+Grain+Specifications/

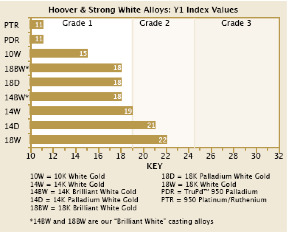
They've also very helpfully ranked their alloys in terms of whiteness here - the palladium alloys are 14D and 18D:
WhiteGoldIndex.gif

The "Grade 1" alloys are said to be white enough to not require rhodium plating, whereas its recommended for Grade 2 and required for Grade 3... so their 18kt "18D" palladium alloy looks like a winner. The cool part, however, is that since they gave us the kt's we know the gold concentration, and since they gave us the density we can calculate the copper and palladium concentrations. Sadly we can't do this for the 14kt alloy because it has three extra metals instead of two. Results:

Code:
kt       Gold        Palladium       Silver       Copper      Zinc      Nickel
18        75             24.5                      0.5
14       58.3             ??           ??           ??
I did compute the density of the 14kt gold/palladium/silver/copper alloy from the first reference and it came out to nearly EXACTLY the same as the density listed for H&S's 14kt of unknown composition... so I can't be sure but I think its probably quite similar.

In any case, that was very long, but the bottom line is that H&S's 18kt recipe is looking like it might be a winner for its superior whiteness.
 
Setting up to cast the new improved waxes tomorrow.

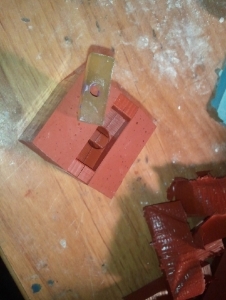
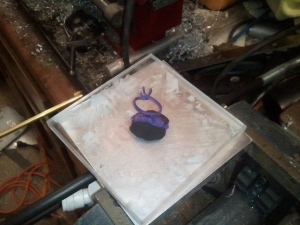
I take my mostly-finished wax and set it up on a glass plate. Modelling clay is good for sticking it down and forming a cup, but I don't know how well or if it burns out properly so I scrape this out once the investment sets.

1_45.jpg

My "flask" is just a piece of steel pipe. I turned the edges smooth on my lathe so that it "seals" just by setting it down on the glass and I don't need a rubber cap. Steel pipe isn't ideal since it rusts like hell when heated... but this one has been through the kiln three? four? times now and is still usable.

Note that I've added some sheet wax along the sides of the flask; this is an experiment. A good/professional vacuum caster uses a perforated flask so that the vacuum can "suck" from the sides as well as the bottom, whereas my setup can only suck from the bottom of the flask. When this wax burns away it will create channels up the sides of the investment between flask wall to deliver vacuum to the sides of the casting as well....... OR it might weaken the whole thing and crack and ruin my day. Like I said: its an experiment.

3_28.jpg

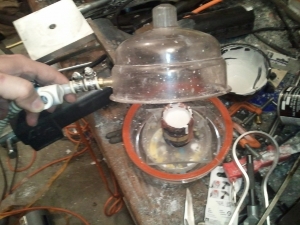
Then the investment is prepped and poured and the whole thing into the vacuum chamber for debubblificatorationing.

4_21.jpg

It takes 2 hours to set but I'll just leave it until tomorrow.
 
Thanks for the update! Like everyone else has already mentioned, I check in to read this thread everyday. I find it really interesting!
 
Undercover999|1322879006|3073249 said:
Then the investment is prepped and poured and the whole thing into the vacuum chamber for debubblificatorationing.

Not only can you create your own engagement ring, you are creating the perfect words to describe the process! ROFLOL! :lol:
 
Is there a reason for you to mix your own alloy instead of buying casting grain? Alloys can be very finicky and minor variations can have a huge impact on casting suitability (such as porosity and doing a good, full pour). If you were going for a traditional alloy such as 18k yellow, green or rose, then it is more straightforward but palladium gold isn't quite as simple. Also, casting is more sensitive than fabricating, where manipulation of the metal will solve a lot of problems.
 
Lady_Disdain|1322923943|3073415 said:
Is there a reason for you to mix your own alloy instead of buying casting grain? Alloys can be very finicky and minor variations can have a huge impact on casting suitability (such as porosity and doing a good, full pour). If you were going for a traditional alloy such as 18k yellow, green or rose, then it is more straightforward but palladium gold isn't quite as simple. Also, casting is more sensitive than fabricating, where manipulation of the metal will solve a lot of problems.

Mostly because I want to utilize my gold bullion, which is the closest thing I have to a family heirloom. Can you elaborate on what makes palladium less straightforward?
 
Newest casting went great!!! I finally figured out how to work my torch - it took only a minute or two to melt my grain this time; last time it took half my oxygen bottle!

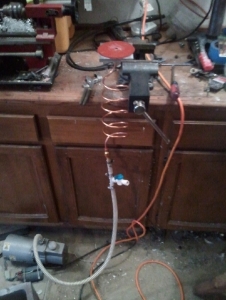
I added a twisty copper tube between the vacuum pump and the casting "table"... I'm a little concerned that my vacuum pump doesn't sound as excellent as it did when I started this project, so the copper hopefully will help cool any hot vapors and keep and metal from reaching the pump if the investment fails (... like it did on my very first try :errrr: ).

newsetup.jpg

I also made a new vacuum gasket with a red "heat resistant" silicone. The old blue one started to melt a bit under a hot flask; this one will hopefully let me reach higher flask temps. I, uh, also cleaned up my workbench a little bit due to a mistake and small fire earlier in the day. Oops. Don't try this at home kids.

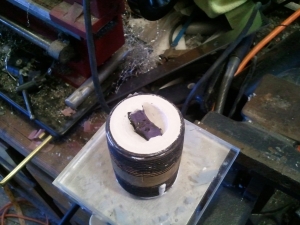
Anyway, here's the finished flask after I've scraped out the modelling clay:
001_1.jpg

Aaaand into the kiln for burnout. I snapped this picture on the final step of the burnout; 1300F... it is HOT!! :shock: HOT, I tell you.
003_1.jpg

Here's a fun lesson learned - wax designed for lost-wax casting and burnout in a kiln apparently is a special brew that burns away cleanly and without smoking. The sheet wax I used for my vacuum channels, however, was not... it smoked like the dickens once I passed 500F, was hard to hide my little project with the garage smoking like I was hiding a pet dragon!

Quicky melt and pour. This shot is taken not long after pouring, you can see the button of metal is still dull-red with heat.
004.jpg

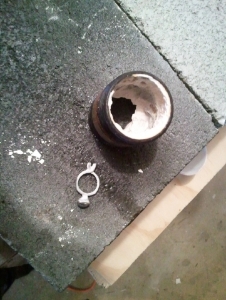
The fun part is quenching - right after that pic I threw the flask under the faucet and the investment kinda explodes. Me likey. Voila!
005_0.jpg

If I was a professional I'd have a witches brew that I could throw the casting in that would remove the stuck-on investment and the oxidation (black coating); I understand this is called "pickle" (heehee)... but that'd be waayyy too fancy for my garage. Instead I've got Naval Jelly (heehee again) which actually does a good job:
006.jpg

You can see I also did better measuring my metal quantity this time - the waste in the button is far smaller. This was a melt of 4.6g of alloy - my CAD model tells me the ring itself requires 2.1g, so I think for the real deal I'll use 3g or so.

Sooooo, how'd it go?

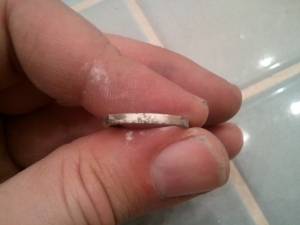
Perfectly!! No voids, no bubbles, nothing... absolutely perfect! The finish is very very good, its a lot like a light sand-blast type finish, should be super easy to polish.

008_0.jpg

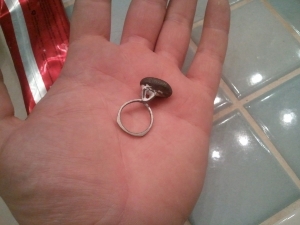
I'll use this ring to sort out my polishing technique, but at this point I think I'm only days away from a final casting. :bigsmile:
 
For quenching the poured metal we'd dunk the the whole investment flask in a bucket of cold water and swish it back and forth with the tongs, and the whole thing would completely disintegrate - so satisfying!

If you're going to make your own alloy, do you have a carbon stirring rod to mix it with? http://www.fdjtool.com/custom.aspx?id=7 Do you have the capacity to safely maintain the high levels of heat necessary? Are you going to test it for purity before you cast the ring? (possibly not necesary) Are you going pour it into casting grain before using it? (I'm not sure if this is necessary or not)

Keep in mind that some zinc will burn off during the alloying process: http://www.youtube.com/watch?v=ioLZUbbzncU Do you have proper ventilation (zinc lungs = :knockout:)? You have to account for that when you measure out your metals. Other alloying metals might do that too.

If your homemade alloy turns out to be brittle, the prongs could crack or snap during the diamond setting process instead of bending nicely like they should - I'm sure you don't want that.

I wonder if you could trade your boullion metals to a jeweller in exchange for the casting grain of your choice? It would stil be using the value of your inheritance, but a lot less messy and heat-intensive.

Stuller X1 is supposed to be nice http://www.stuller.com/pages/1236, and there are a lot of other different casting alloys out there- including palladium white gold (Which I know you prefer).


I'm sorry I ask tough questions - I really want you to succeed. ::)

You're definitely getting much closer to your final cast - the most recent ring looks great!
 
GET 3 FREE HCA RESULTS JOIN THE FORUM. ASK FOR HELP
Top