shape
carat
color
clarity

*bang head here* Home Improvement...triumphs?

Status
Not open for further replies. Please create a new topic or request for this thread to be opened.

ame

Super_Ideal_Rock
Joined
Jul 7, 2004
Messages
10,883
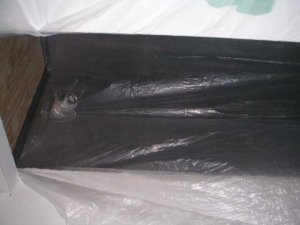
So...my husband and I decided we were going to pull down all that gorgeous (haha) corally pink 65+ year old tile on our bathroom walls because it is so old and the grout so old that water just seeps through and leaks into the crawlspace...I decided that I wanted to remove a tile right in the middle towards the tub to see what we had behind it before I destroy this entire tile over plaster wall. Boy was that stupid. There is what appears to be concrete instead of plaster behind the tiles since it''s that tile that is about an inch off the actual wall. Behind the concrete, wire mesh. ANd you can see to the next wall. Like 4-5 inch space before you see more mesh. So...sh!t. I can''t see how the tub meets that but this tub won''t be going anywhere. THe plumbers that checked out the "leak" that turned out to be the seeping tile and grout both said it''s original cast iron and would take about 8 strong men to get it to move, let alone out of the room. He said not to bother unless we really couldn''t deal with it. So...it''s staying. But damned if I can''t figure out how to handle this situation now. I put a big plastic drop cloth up with duct tape so we could still shower and my dad is coming over tomorrow to assess this. He pretty much said the same thing Idid though...oh crap. Im going to go fish around with a hanger and hope there are studs in there to attach greenboard or concrete board to. Otherwise we have to frame it out. Which will be pleasant.

WHat was I thinking putting a damn hole in the middle of the damn shower wall?!
 
Yikes! Wish I could help. I was surprised, though, to hear that it would be that difficult to remove the tub. We just bought a cast iron tub for our new bathroom and, while heavy, certainly didn''t require 8 men. Obviously, your tub could be much bigger. Ours is a standard 5 foot tub that fits into a three wall alcove (not freestanding) and it weighs 350 pounds. Anyway, I hope you get it straightened out. Good luck!!
 
You''ve got the original lath and plaster walls. The lath means there are small boards running horizontally, attached intermittently to studs (vertical, of course). The wire mesh is nailed to the lath and serves to hold the plaster on the wall. Originally, plaster was not the white crap that we use today, but a thin concrete.

I removed the same coral pink tiles in our bathroom a few years ago. We had to take out the tub surround to the studs, then build it back out with backer board (the concrete kind). The project was big, but we had another bathroom to use/shower in in the meantime. We also ripped up the floor and tiled it.

As far as how it meets the tub, I can only tell you my experience, as I am no expert tiler. Ours just sort of sat on the lip of the tub, sealed with more grout/caulk. It was not attached in any fancy way.

This is a doable project, but it will be time consuming. (Ours ended up taking 6 months, but that''s because we couldn''t be bothered on the weekends during ski season.
9.gif
)

One website/forum I found helpful was http://forum.doityourself.com/index.php . I''ve used it for many other projects as well, and the moderators/contributors have been very helpful and given me sound advice.

Your other option, if you want to keep the pink tile, is just to regrout (or have it regrouted). The old grout must be removed, then new grout laid and sealed. But then you don''t get a new bathroom look. Grout is suppoesd to be resealed yearly to help prevent leakage.

Best wishes on your project!
 
I LIKE the old peachy/pink tile. Re-grout it and leave it!

It''s retro. You are ahead of your time!
 
Date: 10/16/2005 12:02:10 PM
Author: Patty
I LIKE the old peachy/pink tile. Re-grout it and leave it!

It''s retro. You are ahead of your time!
too late....

I am probably leaving the kitchen, it''s white and black. If we redo the kitchen Im letting it go but for now it''s fine. The pink we just can''t deal with. If it matched the floor in any way...Id be more likely to.

Now that I read what Tali said Im really not sure what to do. We don''t HAVE another bathroom and we planned to tape some plastic over the walls till we finished tiling them.
 
Oh geez, that sucks. I don''t know about all this kind of stuff. So I''ll just say good luck and hope you can get it figured out soon.
2.gif
 
Well...today my dad came to assess what we had going on....he and I had aboutthe same reaction which was "aw crap". We chiseled away at this tile for an hour before my dad decided there was no way we were going to have a smooth enough surface to readhere tile to because every whack we took crumbled this concrete that the tile was adhered to. So he suggested we sledge hammer. SO we did. We have most of the main shower wall done, we did some of the wall that is up against the outside of the house, which we decided isn''t probably wise to hammer on with a sledgehammer. And I got a little bit excited at one wall that is the wall between the hall closet and the bathroom. Almost went right through it. hehe. My husband is off work all week so his job is to just destroy. Our goal, a lofty one, is to have green/concrete board up by Friday night/Sat morning and start tiling on Saturday. If we can have the shower part done by Sunday Ill be really happy with that. We will need to tear up the bathroom floor too, but I want the walls demo''d first. Then we can tile the walls and then the floor. We will learn a lot through this....
 
Oh, Ame, don''t let our laziness deter you! Our project only took 6 months b/c we chose to let it. We''d rather ski, and use the downstairs shower/bathroom, than work on a bathroom project. It taught us not to do a project in the winter! Either Fall or Spring, our in between outdoor times, is better for us.

I don''t know if you have a "saws-all" aka reciprocating saw, but those are really helpful for demolitions, and a cold chisel works great to pop off the tiles with as little damage to the wall as possible. Have fun choosing the tile! That and grout color took the most time for us. :)
 
Eeech. Sorry Ame, hope this works out well. In the meantime, your title reminded me of a "free therapy" technique we used in high school. Just print this out and tape it to the wall outside your bathroom, and use as necessary, or until you pass out.
14.gif


BangHeadHere.JPG
 
ARGH!!!!!!!!!

Yup, when we had out 1930s tile pulled off, the contractor had to charge us about a grand more b/c he had to completely demo the walls... they laid tiled a bit differently than they do today LOL...that''s why they stayed on for 75 years...good news for the tile, bad news for you..yikes. He had to completely go to the studs and actually reframe like you say and put new greenboard and/or wonderboard over it. Then he had to plaster coat it to get it smooth. Not an easy job... Just use lots of plastic wrap and tape and you''ll be fine to shower. I had my ENTIRE shower gutted to the frame except for the floor and I showered in a big plastic bubble LOL...
 
This was my own personal shower hell...LOL.

I post this to make you feel better...it could be worse ...
6.gif


showerhell.jpg
 
"Oh dear, this does look bad" .... LOL... Ahhh, I remember this all too well...

Ame- I stringly suggest John Bridge''s forum on tiling. It''s awesome...but it does sound like you guys know what you''re doing....

greenboard.jpg
 
We actually have no freaking idea. My dad is who knows. And conveniently he's in PA for work all week!!!

I was trying to find a before photo but I can't find one, I should post a photo of where it is today. Ryan spent all day tearing things down and feels like he got nowhere. I might put a mask on and go at it tonight for an hour because any more than that and I cant hardly breathe. He wanted to be done tearing it down tonight or tomorrow, lofty goal...and highly unlikely.

My coworker offered some kind of air hammer, that he said worked well but I don't know if my dad has an air compressor I can snag.
 
Ame- please do be careful of asbestos too....
 
OMG, I feel your pain!!!
OUR 1940 city house has a bathroom that is floor to ceiling tile, with a crummy little tub that is just plain horrible! I thought it would be our first project to remodel but after we started trying to agree on what we wanted we''ve abandoned the idea till next year. I''m sure we''ll face many of your issues as well unfortuately.

A bigger problem for us is that several of our walls are stucco, highly texturized. Stucco Hello. For now I''ve painted them a color I can live with but we know eventually well tackle them some how making them smooth. Many of them are plaster, some are concrete and in some places they are wall board with plaster over it. Yuck.

We knew this house would be a huge project, in the meantime we enjoy it for what it is. We''re taking a break right now from it all, I have to be mentally ready to rip into each new project. We plan to gut the kitchen after the holidays since finally I have a plan I think I live with on that one.

One thing we''ve discovered is that there is hardwood under all the carpets and tile over that in the kitchen?????
23.gif
Eventually we''ll rip it all out and either salvage the hardwood or put in brazillian cherry with some tile.
 
If you can save your hardwood it will be so worth it. The folks we bought from completely refinished all the floors. I do wish they had gone a more mahogany shade like the other woodwork in my house but it''s fine. Just lighter than I like, not a fan of light wood.

After two solid days of at least one of us banging...still not very far. The hardest wall so far is the "outside" wall of the house. Jesus this tile is on there. He gave himself crazy blisters taking a wall apart today. I think Im mostly concerned with doing the shower as much as possible then moving to the rest. Either way...god this sucks.

I wish there was an easier way.
 
Ame...you guys mght need a sledge hammer to get it off...this is (I believe this is what it's called) a "mud job" which is basically cement...*edited- that's what tali said above! ... they didn't have thinset back then LOL so the tiles will take the wall with it. You guys are very brave...but hang in there...you'll feel good when it's done...
 
We had this sort of problem, too, intending to hire a guy with a shingle in the area who sold tile to redo the bathroom, but in the end, had no experience with this. He said he needed to disengage for the demo part and hire our own guy, which we then did. Very wierd. From what I''ve heard, you may want to use something like "duraboard," not green board, as a back, as it''s better, longer lasting for a shower area.

Best wishes,
 
Yea we have a sledgehammer and it''s not doing any better than a regular hammer. Which is annoying.
 
Yes, Ira, I've read (and I'm only .000001% knowledgeable in this area) that greenboard should never be used in the shower/tub area even with a vapor barrior... wonderboard or duraboard is the way to go in wet areas...greenboard can be used for the remainder of bathroom walls... I think ame needs to enlist Tali to come over there! I'm a total beginner.

Again, John Bridge is the best tile and remodeling forum out there for help...

Ame- have you considered getting someone just to come in and do the demo for you...it shouldn't be that expensive? Or if you're cool putting in the time, it will feel good and cost you nothing to keep doing it yourself....
 
I can''t imagine who would
2.gif


We thought about it but Id bet no one wants to do this work and those who do will charge us out the nose.

So no greenboard? Weird. That''s what EVERYONE has told us to use!
 
In a wet area? No way! I wouldn't permit it.
 
Ame, this is from one of the many seasoned vets on john bridge...I lived there while my bathroom was being done...


"Best I've been able to determine over these many years, MR board (greenboard/greenrock/green sheetrock/whatever) is primarily good for making the customer, and sometimes an inspector, think you actually know something about what you're doing. And sometimes to meet code, but that's gonna be gone one of these years.


And I've conculded for at least the past five years that there is no other really useful purpose for the stuff."


My contractor used greenboard for the walls where the tile came down but were dry areas (the wall by the toilet as you can see in that pic)... Although I have read in a few places that greenboard can be used with a vapor barrior...most places say no online.. Dunno...

Behind the sink, tub and shower went wonderboard. That sh*t is like bits of cement and glass or something......When he sawed it, little pieces fly around but the edges were nice so he could easily put those metal corner thingamabobies on there for a nice crisp wall corner...


God, it's like that mortgage commercial...."I don't even know enough to know that I don't know"
40.gif
 
UPDATE
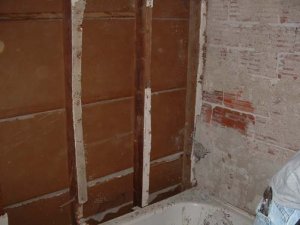
After a week of beating the crap out of the unpleasant surprise in our pink bathroom, we are down to one last wall...Under that ghastly pepto tile was concrete, an inch thick of it, on top of wire mesh adhered to strips of wallboard on the studs, with plaster over wallboard everywhere there wasn''t tile, OR brick under concrete under tile.

Last Saturday yknow I took a huge hunk of wall out in the shower to see what we were dealing with and how the tub met the wall...stupid stupid stupid. I regretted that immediately. But my dad has been DYING to tear this tile out since we bought this house so this was something he was giddy about. So that''s helped since the hubby and I have no clue what the hell we are doing.

Today we took the potty and the sink out so we could open that wall up, the room feels much bigger without both...hmm. My dad is really loving this. I am glad he is and that he knows these things since we sure dont. He is planning to come over Monday evening to work on putting wallboard up.

Here are a few photos. Unfortunately I cannot find the "before" photo to save my life.

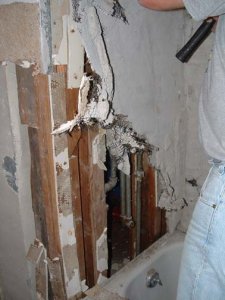
showerpipewall.jpg
 
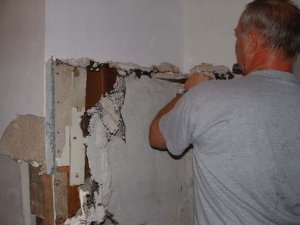
Here is my dad going at the wall the shower head and pipes are in. We waited for his return from a business trip to do that, as he suggested, because we had no clue what we would get with that wall and he wanted to be there in case we hit something bad, which luckily we didn''t.

dadchippingaway.jpg
 
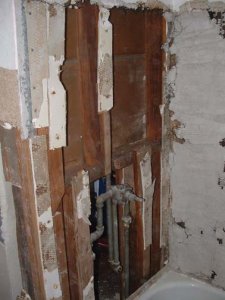
same wall, after my dad cleared that out.

The husband and my dad tag teamed well. I tried helping but the room is so darn small that it''s hard to get more than one person in there.

pipes.jpg
 
Thewall on the right there is worst freaking wall of them all. This was the wall with the bricks, I sort of show the rest in the other pic below but we havn't decided if we wanna pull that concrete down now, it's surprisingly level. I started this and did the first couple rows at the top, and Ryan spent damn near 2 days going at it. My dad was so impressed with how far Ryan got on this in two days. We couldn't sledge hammer this, all hammer and chisel.

showeroutsidewall.jpg
 
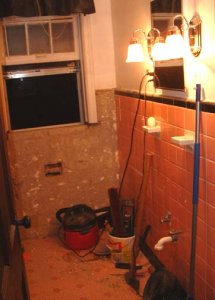
This is the last tiled wall, the toilet/sink wall. We are going to demolish it tomorrow I think. The window is the same brick wall that I just spoke of.

lastwalltiled.jpg
 
Status
Not open for further replies. Please create a new topic or request for this thread to be opened.
GET 3 FREE HCA RESULTS JOIN THE FORUM. ASK FOR HELP
Top