shape
carat
color
clarity

DK/BGD Custom Setting...The Home Stretch

Hey, Sledge! My apologies for not reply earlier, even though you tagged me. Been traveling for work. But! It’s clear you are in excellent hands here with all of the advice and diagrams you’ve received. I know you’ll both be thrilled with the final outcome. =)2
 
i just gotta say, @rockysalamander you are pretty awesome at CADs! :clap: @sledge i think you hit the nail right on the head when you said DK seems to be trying to make it more symetrical when your intended seems to like the asymetry of the setting. i'm sure it will take a few more reiterations but it's coming along nicely!
 
No worries @mrsgreeneyes. Hope you are having fun and staying safe in your travels. I'm getting excited as the end is near. I asked DK today if they can make 6/29 as I'd like to present the ring on the evening of 6/30. Amy confirmed yes! =)2

Stay tuned @farrahlyn & @rockysalamander and everyone else. I talked with Amy @ DK this afternoon and she confirmed revision 3 of the CAD's will be coming back shortly. Apparently they just got back from Vegas at the JCK show. Also, she is going to create a plastic model of the ring and ship to me to give me a better idea. She thinks part of the issue is the CAD's are thicker/fatter than the actual ring due to polishing, etc. and so some of the reference lines, etc we are using isn't giving a true representation.
 
Okay everyone, just got revision 3 emailed over to me. Also, Amy @ DK confirmed she is making a plastic version of this iteration to mail to me so I can see the real deal in-person.

Please keep the comments coming. Although I've been giving all the credit to you fine people on here for helping, she thinks I actually know what I'm talking about and really good at articulating my desires, lol. Without you guys, I'd be nothing so thank you bunches!!

FYI, I did notice they left the stones out of the wedding band on this iteration. I did not request this, and think it was a mistake when the corrections were being made.
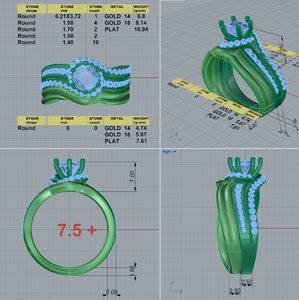
44836-quad3.jpg
 
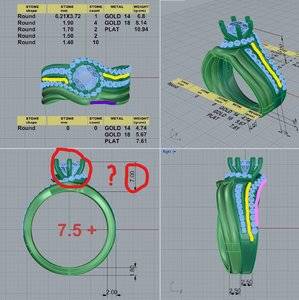
Are there visible gaps between the channel and the pave bands that we're not seeing on the cad? The ring just looks so bulky without seeing the distinct separation. Can the pave band be flared out and more gradually curve in with separation rather than the abrupt bend I see on the 4th cad pic?
 
Last edited:
Okay everyone, just got revision 3 emailed over to me. Also, Amy @ DK confirmed she is making a plastic version of this iteration to mail to me so I can see the real deal in-person.

Please keep the comments coming. Although I've been giving all the credit to you fine people on here for helping, she thinks I actually know what I'm talking about and really good at articulating my desires, lol. Without you guys, I'd be nothing so thank you bunches!!

FYI, I did notice they left the stones out of the wedding band on this iteration. I did not request this, and think it was a mistake when the corrections were being made.

44836-quad3.jpg

I have to be honest, I’m glad they left the WR bare; it was getting confusing trying to distinguish ER from WR contour lines & separation. I also think it makes it easier to determine the curves, and lines, this way.
 
I must say, CAD #3 is a huge improvement, and looks so beautiful!!! It’s going to be amazing, after it’s polished & the prongs are done!
 
Are there visible gaps between the channel and the pave bands that we're not seeing on the cad? The ring just looks so bulky without seeing the distinct separation. Can the pave band be flared out and more gradually curve in with separation rather than the abrupt bend I see on the 4th cad pic?
Yes, I think there are visible gaps, or at least there is supposed to be. I think they are very hard to see in the CAD drawings because of the green colors they used in the renderings.

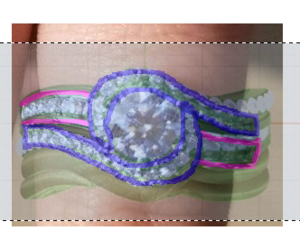
I've added a few markups:

Yellow = where I think the visible gaps are located
Pink = what I think you mean by smoothing out the curve in the 4th pic
Red = my concern about the diamond height and the prongs (they look hideous in the CAD)*
Purple = they added this swoop back, but I think it needs stretched out longer so it transitions more smoothly

* = As you might recall, there was a suggestion to lower the diamond. One of the features my girl actually liked was that the diamond was higher so even though the swoops create a halo, it had enough variance in the heights so it didn't "bleed together" like a normal halo. How do I know if 7mm is the right height?

Inked44836-quad3_LI.jpg

I have to be honest, I’m glad they left the WR bare; it was getting confusing trying to distinguish ER from WR contour lines & separation. I also think it makes it easier to determine the curves, and lines, this way.

Yeah I can see that. Maybe I will ask Amy if she can create CAD's of the e-ring, wedding band and then the combo which we currently see. It's almost too much to take in all at once. As-is I think it is easier to see.

Here I go again assuming, but I think maybe Amy left the wedding band blank to do just as you noted since it did get kind of cluttered up. As long as she doesn't forget the diamonds on the final product, we're good.

I must say, CAD #3 is a huge improvement, and looks so beautiful!!! It’s going to be amazing, after it’s polished & the prongs are done!

Thank you so much! I think you are right. It's beginning to take the correct shape and form, and getting that band to twist more was what was missing. Huge thanks to @rockysalamander for helping me communicate that to them properly. She has stepped up countless times in my diamond search, setting search and now all this custom work. I know I keep saying it, but I really do appreciate her and everyone else's input and help. I couldn't have done this without all of you!
 
I think they are very hard to see in the CAD drawings because of the green colors they used in the renderings.
I'd make sure because I see the gap a bit more clearly on your post #78(3rd page) 2nd cad drawing.
 
i think this rendering is just about SPOT ON given the gaps are going to be there. the tilt on the swirl going up is perfect. On the height of the stone, i went back and looked at the original setting and when the stone was set in it, the entire profile of the stone including the culet was visible. i think that's a tad high. On this CAD rendering, it looks slightly lower, the culet is just covered which i think is just right. i wouln't lower it anymore because then you're going to start to get that halo look. She doesn't want a halo, she wants an asymetrical swirl bypass type of setting. i think this is just high enough to get out of halo territory without looking like the head was just plopped in there as an afterthought. As far as the prongs, all CADs will look like that, the prongs will be refined on the finished product, no need to worry about that.

Take a look at this project of his. the CADs are on the first page and the finished product on pg 13. This is one of my top 3 favorite rings here on PS :love:
https://www.pricescope.com/community/threads/dk-cad-assistance-needed.234335/

I can't wait to see the wax replica!
 
Are there visible gaps between the channel and the pave bands that we're not seeing on the cad? The ring just looks so bulky without seeing the distinct separation. Can the pave band be flared out and more gradually curve in with separation rather than the abrupt bend I see on the 4th cad pic?
Wow. This is getting really close. What a patient person you are!

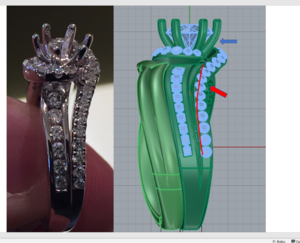
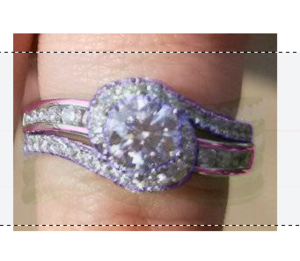
I agree with @blueMA that it is hard to know if the gap between the shanks is enough. The inspo. picture makes is look larger as the rings are tipped toward the viewer. So you are seeing more through that gap. But, I think there is a real difference to resolve. I'll start by saying I personally like the DK version. But, it is not quite exactly the inspo. To make it match the inspo, they need to shallow the angle from the halo down to the shank (red line; arrow). Basically, the two shanks need to be separated for longer. This is the same concept as your pink line. But, maybe this drawing will help communicate it.

upload_2018-6-8_8-48-31.png


I think that a 7 mm stone is very very high and she will knock it on everything. i would have it set about 1 mm above the halo, but that is not what SHE wants. And it is easier to remove metal than add. So, I'd leave it high (maybe drop to 6-6.5) and then adjust if needed. Just make sure DK assures you that the "hole" in the bottom of the halo is wide enough if she ultimately wants to drop the stone to a more "halo" height.

The prongs always look terrible in CAD. Don't worry. If you say delicate prongs, you will get delicate prongs from DK. I have full confidence.

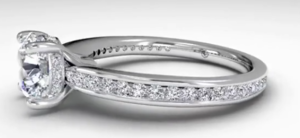
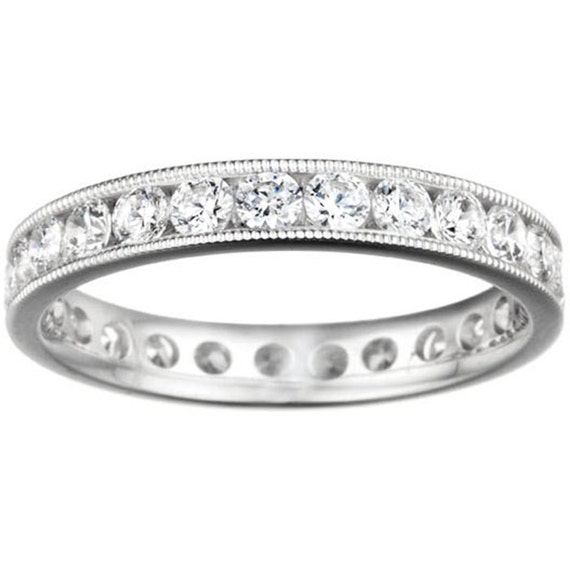
Ok. One this we have not talked about is cleaning access to the diamonds. The pave shank seems to have some square-holes, which is quite what I'd like to see. You can check with DK, but I like my pave bands to have nice big holes so I can get a brush against those diamonds. The channel band seems to be solid and I would really suggest cleaning access.
These are too small
upload_2018-6-8_9-0-33.png

These are better and are fine.
il_570xN.481707414_72or.jpg

If the pave band has squares, then I'd want the channel to as squares for access as well. These are nice and big. This will make the setting less hefty, but likely won't alter the price as this is a ton of finishing. But, dirty diamond can lose 2 color grades. So, you want to be able to clean and dry them well. You won't have these on the halo area just the shank.
f2d8391e2ba18a62ac2e71c875de03a1.jpg
 

Attachments

  • Picture1.jpg
    Picture1.jpg
    24.8 KB · Views: 7
Just make sure DK assures you that the "hole" in the bottom of the halo is wide enough if she ultimately wants to drop the stone to a more "halo" height.
This is important - this will also assure the swirl be flared out enough from the top view. Remember your gal didn't want that swirl view impeded by a larger stone.

I like my pave bands to have nice big holes so I can get a brush against those diamonds.
Teeny tiny holes are absolutely maddening if not impossible to clean, so absolutely ask the holes are big enough.
 
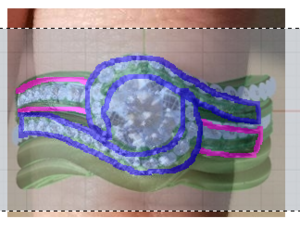
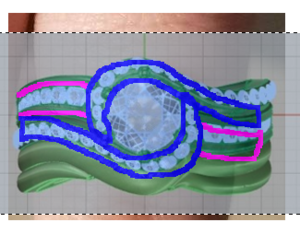
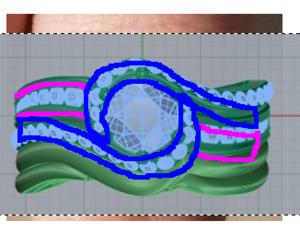
While I do like this last iteration much, much better I have been toying around with GIMP to check alignments, etc. Below is a series of screen captures I used of the same image at various transparent levels. Things aren't exactly lined up but I think it kind of shows the last little bit of misalignment issues.

You all agree?

Capture.PNG Capture2.PNG Capture3.PNG Capture4.PNG Capture5.PNG Capture6.PNG
 
I'd make sure because I see the gap a bit more clearly on your post #78(3rd page) 2nd cad drawing.

I went back and look, and see what you mean. The gaps were more pronounced for sure. Hmmm. I will take a look at the wax model once it gets here and shoot some pics, and then adjust as needed so we get this right. Thank you!


i think this rendering is just about SPOT ON given the gaps are going to be there. the tilt on the swirl going up is perfect. On the height of the stone, i went back and looked at the original setting and when the stone was set in it, the entire profile of the stone including the culet was visible. i think that's a tad high. On this CAD rendering, it looks slightly lower, the culet is just covered which i think is just right. i wouln't lower it anymore because then you're going to start to get that halo look. She doesn't want a halo, she wants an asymetrical swirl bypass type of setting. i think this is just high enough to get out of halo territory without looking like the head was just plopped in there as an afterthought. As far as the prongs, all CADs will look like that, the prongs will be refined on the finished product, no need to worry about that.

Take a look at this project of his. the CADs are on the first page and the finished product on pg 13. This is one of my top 3 favorite rings here on PS :love:
https://www.pricescope.com/community/threads/dk-cad-assistance-needed.234335/

I can't wait to see the wax replica!

Thank you! After reading your comments, I went back and looked and you were correct, the whole diamond is exposed. She specifically commented how she liked the diamond being higher so I think it's best to leave it alone. I don't think she is as detailed as myself and others here, so I don't think she will notice that fraction of a difference.

Also, I appreciate the vote of confidence on the prongs. Glad it's not just me seeing that, because they are funny looking. :lol:


Wow. This is getting really close. What a patient person you are!

Thank you @rockysalamander. You are a total sweetheart, and I couldn't have gotten this far without you. So while I may appear to be patient, I promise it's because of you and the other fine people on this forum giving me the encouragement and advise I need to get through this that has made this entire adventure so successful.

I agree with @blueMA that it is hard to know if the gap between the shanks is enough. The inspo. picture makes is look larger as the rings are tipped toward the viewer. So you are seeing more through that gap. But, I think there is a real difference to resolve. I'll start by saying I personally like the DK version. But, it is not quite exactly the inspo. To make it match the inspo, they need to shallow the angle from the halo down to the shank (red line; arrow). Basically, the two shanks need to be separated for longer. This is the same concept as your pink line. But, maybe this drawing will help communicate it.

upload_2018-6-8_8-48-31.png

I think I'd like to see the wax piece Amy is sending. One of the things my girl said she particularly liked was the gaps showed her skin below and broke up the ring a little bit. As long as the gaps are big enough, I too kind of like the DK version a little better and may go with that instead of changing to match the inspiro. It's kind of cool to see them side by side how you did, and I can see how DK made the lines a little more sexy and curvy, and classy IMO.


I think that a 7 mm stone is very very high and she will knock it on everything. i would have it set about 1 mm above the halo, but that is not what SHE wants. And it is easier to remove metal than add. So, I'd leave it high (maybe drop to 6-6.5) and then adjust if needed. Just make sure DK assures you that the "hole" in the bottom of the halo is wide enough if she ultimately wants to drop the stone to a more "halo" height.

I will talk with DK and see what changes if they lower the stone a little. My early conversations with them indicated they could move the stone vertically as we needed/desired. You are definitely spot on about the hole at the bottom. One of the things she liked about the smaller stone was that the lines between the halo and stone didn't "bleed" together. She liked the stone setting inside the limits of the halo swirls. So that stone needs to be able to drop all the way down like you are saying!

The prongs always look terrible in CAD. Don't worry. If you say delicate prongs, you will get delicate prongs from DK. I have full confidence.

Phew. As I noted above, they do look funny in the pictures. I guess my inexperience with knowing how to manufacture jewelry doesn't allow me to see they need X thickness so they can grind & polish the fat steel into a streamlined piece.

Ok. One this we have not talked about is cleaning access to the diamonds. The pave shank seems to have some square-holes, which is quite what I'd like to see. You can check with DK, but I like my pave bands to have nice big holes so I can get a brush against those diamonds. The channel band seems to be solid and I would really suggest cleaning access.
These are too small
upload_2018-6-8_9-0-33.png

These are better and are fine.
il_570xN.481707414_72or.jpg

If the pave band has squares, then I'd want the channel to as squares for access as well. These are nice and big. This will make the setting less hefty, but likely won't alter the price as this is a ton of finishing. But, dirty diamond can lose 2 color grades. So, you want to be able to clean and dry them well. You won't have these on the halo area just the shank.
f2d8391e2ba18a62ac2e71c875de03a1.jpg

Wow, I am so glad you mentioned this! In the rendering I saw the cut outs and was thinking to myself "oh, I need to tell DK to make sure she has a comfort fit style band" meaning I was going to cover all those gaps. On a guys rings (without diamonds) the gaps create sharp edges and I don't like them so just assumed she wouldn't either.

I wasn't even thinking about needing them for cleaning, etc. So total amateur move on my part. On a side note. With the gaps/holes in there, will the polishing still provide a nice smooth comfort fit type feel with proper polishing? I don't want her to feel like her hands are being cut up or irritated because of them.

Lastly, I agree -- the pave and channel set parts should both have access. I will check the wax replica to see how they handle this and make sure I request it from DK.


This is important - this will also assure the swirl be flared out enough from the top view. Remember your gal didn't want that swirl view impeded by a larger stone.

Bingo! She really didn't like the look of a bigger stone because of the way it bled over. While I know she won't catch every little detail, this is one I think she will notice and has to be right!

Teeny tiny holes are absolutely maddening if not impossible to clean, so absolutely ask the holes are big enough.

LOL, as a guy I am familiar with this struggle. My paws are always too big for wherever I need to put them. Just the other night my girl dropped her phone in the couch and I couldn't get it because my hands were too big. I was figuring out a way to get it from the bottom when I saw her hand slip down like no problem and grab it. My point is I will make sure DK gets the holes right. ;)2
 
LOL, as a guy I am familiar with this struggle. My paws are always too big for wherever I need to put them. Just the other night my girl dropped her phone in the couch and I couldn't get it because my hands were too big. I was figuring out a way to get it from the bottom when I saw her hand slip down like no problem and grab it. My point is I will make sure DK gets the holes right. ;)2

It's not the size of the hole, but the size of the...

OK, there's a joke in here somewhere, but I'll just leave it at that. :mrgreen:

Anyway, I'm glad you're getting to the home stretch with the setting. I agree with @rockysalamander, this is getting REALLY close.
 
^trunk :P2
Sledge this most recent iteration is lovely. I agree that sloping/tilting/twisting the (not) halo and side diamonds really makes it more like the inspiration ring - and will allow for multi-angle bling viewing!

Yes to the holes for cleaning access! Super necessary and they'll smooth it down she'll never even feel that.

Can't wait to see the wax/plastic version. Are you having them send it to your work so she doesn't open it?
 
I really, REALLY love this iteration of the CADs! It's gonna be great!!
 
It's not the size of the hole, but the size of the...

OK, there's a joke in here somewhere, but I'll just leave it at that. :mrgreen:

:mrgreen2: :lol-2:

I so have a story to share, but it's so in appropriate. :whistle:

And thank you @TreeScientist for the vote of confidence. It's been quite the journey and I've learned so much in a very short amount of time. I am happy with where I see this going now and the excitement is building up!

By the way, I have to say what has surprised me the most in the process is that I'm a good decision maker and very focused and relaxed in extremely high pressure situations. But this setting.....ahhh, it's taken me on a roller coaster of emotions which is abnormal for me.


Sledge this most recent iteration is lovely. I agree that sloping/tilting/twisting the (not) halo and side diamonds really makes it more like the inspiration ring - and will allow for multi-angle bling viewing!

Yes to the holes for cleaning access! Super necessary and they'll smooth it down she'll never even feel that.

Can't wait to see the wax/plastic version. Are you having them send it to your work so she doesn't open it?

Thank you so much for the kind words @ringo865. I am also really digging this last revision. It's not identical to the inspiro but I think it's better in it's own way. I absolutely cannot wait to see the wax/plastic version! And yes, they are being delivered so she won't be able to stumble upon them.

I am glad to hear the holes will be polished and smooth so she'll never feel the edges, that was my only concern!


I really, REALLY love this iteration of the CADs! It's gonna be great!!

Thank you @msop04! It means alot hearing that from you, because I think the simplicity of your setting and big stone is simply gorgeous. :love: :love:

I wanted something very similar when I first started thinking about a ring for my girl. Little did I know we'd be going down a road of a smaller diamond and twisty curvy bands, lol. But hey, it's her ring and I want her to absolutely LOVE and ADORE it!!
 
On a side note. With the gaps/holes in there, will the polishing still provide a nice smooth comfort fit type feel with proper polishing? I don't want her to feel like her hands are being cut up or irritated because of them.
They will be well polished to the point where she will never even feel those openings, promise! DK has done all of my rings this way, including a full eternity, and GOOD LORD his rings are the most comfortable rings I've ever worn. To me this is truly the beauty and genius of David Klass - gorgeous pieces that are designed to look beautiful while still being comfortable and a joy to wear.
 
Okay....the wax/plastic model showed up today. Snapped some quick pics to share but haven't started analyzing yet. Initial impression is that it's still off. :(2

2018-06-13 14.15.03 HDR.jpg 2018-06-13 14.15.58 HDR.jpg 2018-06-13 14.15.19 HDR.jpg 2018-06-13 14.15.38 HDR.jpg 2018-06-13 14.17.29 HDR.jpg 2018-06-13 14.16.11 HDR.jpg 2018-06-13 14.16.38 HDR.jpg 2018-06-13 14.17.14 HDR.jpg
 

Attachments

  • 2018-06-13 14.16.15 HDR.jpg
    2018-06-13 14.16.15 HDR.jpg
    113.4 KB · Views: 11
It'll probably look much better with the diamonds set. Cheer up! =)2

It definitely needs more gap as previously discussed, and the swirl need flared out a bit more to allow for the stone to be set lower if needed later. I never got a good look on how the wedding band was supposed to stack next to the ring, but it looks a bit clunky right now - thin it out a bit?
 

I am re-posting the original inspiro pictures above for easy reference.

Things I've noticed:
  • Channel set band has too much twist and is not wide enough. It appears very dainty in real life and just off. You can see the difference looking at post #101.
  • As noted by @blueMA, the split between the channel set & pave portions of the shank need to be much larger.
  • Amy and I have talked via email (since the last CAD revision) and the top definitely needs adjusted so the diamond can sit lower (if ever desired); however, Amy was suggesting we lower now. My girl liked the height of the original ring and the fact the diamond did not bleed over into the halo, so we need to make the opening bigger regardless if we lower the stone now or not.
  • I need to have them add the cleaning holes to the pave portion of the bands.
  • The w-band isn't right either. I've kind of ignored it as the e-ring is more important, but essentially the inspiro ring has the pave sitting at a higher elevation level than the plain portion of the shank. In the replica, they are almost even.
  • I think once the issues with the e-ring are resolved, we can work on the alignment/fit of the w-band. Some of the issue in these pictures is the plastic molds came with both pieces attached at the bottom so they aren't fitting snug like the CAD's show.
  • Depending what Amy tells me, I am considering putting the revisions of hte w-band on hold until I can ensure we get the e-ring done and shipped to me by 6/29. I am running out of time.
  • I'm seriously considering letting my girl see the plastic models and get her input. She knows I'm up to something and that the ring is coming so this isn't a stealth operation by any stretch.
Obviously I would love to hear more of everyone's input and suggestions. For now, I'm going to grab some wings and maybe a few crown & cokes and let all this stew. :cool2:
 
I am re-posting the original inspiro pictures above for easy reference.

Things I've noticed:
  • Channel set band has too much twist and is not wide enough. It appears very dainty in real life and just off. You can see the difference looking at post #101.
  • As noted by @blueMA, the split between the channel set & pave portions of the shank need to be much larger.
  • Amy and I have talked via email (since the last CAD revision) and the top definitely needs adjusted so the diamond can sit lower (if ever desired); however, Amy was suggesting we lower now. My girl liked the height of the original ring and the fact the diamond did not bleed over into the halo, so we need to make the opening bigger regardless if we lower the stone now or not.
  • I need to have them add the cleaning holes to the pave portion of the bands.
  • The w-band isn't right either. I've kind of ignored it as the e-ring is more important, but essentially the inspiro ring has the pave sitting at a higher elevation level than the plain portion of the shank. In the replica, they are almost even.
  • I think once the issues with the e-ring are resolved, we can work on the alignment/fit of the w-band. Some of the issue in these pictures is the plastic molds came with both pieces attached at the bottom so they aren't fitting snug like the CAD's show.
  • Depending what Amy tells me, I am considering putting the revisions of hte w-band on hold until I can ensure we get the e-ring done and shipped to me by 6/29. I am running out of time.
  • I'm seriously considering letting my girl see the plastic models and get her input. She knows I'm up to something and that the ring is coming so this isn't a stealth operation by any stretch.
Obviously I would love to hear more of everyone's input and suggestions. For now, I'm going to grab some wings and maybe a few crown & cokes and let all this stew. :cool2:

Looks like you've covered all the points that I was going to bring up. I definitely still think it's close. The main difference that I've noticed between the wax model and inspiration photos is the lack of "twist" or "swirl" in the rising shank, but you and @blueMA already mentioned that.

Regarding showing your girlfriend, it's a tough call. If you already think she suspects something, then maybe it's worth bringing her up to speed with the process, at least in getting her input on the current rendering. I know the surprise vs get-input debate has been rehashed numerous times on this site, but I think the true answer (as with most difficult questions in life) is "it depends on the cicrumstances."

I know that doesn't help you much :mrgreen: so sorry for the wishy-washy response to that question. But you know your girl best.

Whichever way you go, I'm sure she'll regardless love the effort that you have put into making her dream ring become a reality. :)
 
Yes to letting your SO weigh in....custom is tricky and I think getting her input to ensure she's happy with it outweighs the delight of the surprise factor in this case. Good luck!!!
 
I really think this is getting really close. I know it is hard, but custom is hard and this is a very intricate design. I'm on the fence about showing your girl. I fear that seeing it in the flat/green model might make it hard for her to visualize the end product. She's struggled to identify what she liked and this form might just look too different from the inspo... So, I'm no help at all on this.

I think you don't need to really worry too much about the pave cleaning holes other than to note you'd like them as big as possible. Setting pave starts with a solid band and then they drill holes to make the seats. So, they just need to drill all the way through the shank. Thinking about this, they might end up round and I'd live with that as long as they are as wide as possible.

Weddingband. I'd keep ignoring it until you get the ering right. Otherwise, there are too many moving parts.

I think the channel shank is fine, but as I noted before does look different than the inspo still. If you add the graduated stones back (likely upper 3-4), that will give it more visual impact. But, you want to be clear that you want the extra width to be added to the non-pave side to give the wider stones room (i.e., don't increase the width along the centerline of the channel shank, add all the necessary width to the non-pave side only, and then re-center the lower part of the shank). That will increase the twist that your girl loved and give more presence to the channel band and widen the gap a bi. One of her "love" settings had a very significant offset of the shanks.

Pave band, They need to start curving the pave shank outward lower and earlier, as I noted in my last post.. That will provide more of a "gap" between the two shanks like the inspiration. You essentially want a wide split shank look.

Do not lower the stone more than you have already unless your girl ok's it. Just have them make the opening big enough to drop the stone later. That will also make the halo-donut a bit bigger which feeds into my next note for you.

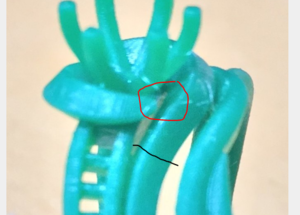
I think the halo being properly sized to fit your stone is also affecting the look. I wonder if they used slightly bigger melee on the halo/wrap if that would give it more of the presence of the original and look more like what you have in mind. If they slightly increased the size of the melee around the black line (maybe .5 mm more), that would be a good way to get the more distinct look of the inspo. and make the twisted halo more visible.

I'd have them maintain the taper in the red circle, but have the interior "point" of the tapered end in physical contact with the shank to remove the gap I think I see. You don't want that gap there. Things will get caught when dressing and it will be annoying. So, they keep the tapered end, the point just contacts the pave band to make a solid connection with no "slot".

upload_2018-6-14_8-37-34.png
 

Attachments

  • upload_2018-6-14_8-34-39.png
    upload_2018-6-14_8-34-39.png
    265.5 KB · Views: 6
It really depends on how your GF is. Is she meticulous and artsy? Is she good with visualization and DIY work? Based on the past posts, I didn't get that sense. I've come to conclude that you're much better at this than she would be.

I know I've suggested to bring her into this a while back when you were just staring out, but I'm not so sure at this moment after all you've gone though this far out. You know what she wants and it's really a matter of final execution.

I'll be honest and tell you that I'm personally quite frustrated with the results you've gotten so far after so many iterations. I don't know if there's communication problem or not but I would've lost it already by now given that they have many photos to simply make a replica. :wall: However, there's only a few more changes to make, and you're almost there!

Hang in tight, but ultimately it's up to you for making that call.
 
I am re-posting the original inspiro pictures above for easy reference.

Things I've noticed:
  • Channel set band has too much twist and is not wide enough. It appears very dainty in real life and just off. You can see the difference looking at post #101.
  • As noted by @blueMA, the split between the channel set & pave portions of the shank need to be much larger.
  • Amy and I have talked via email (since the last CAD revision) and the top definitely needs adjusted so the diamond can sit lower (if ever desired); however, Amy was suggesting we lower now. My girl liked the height of the original ring and the fact the diamond did not bleed over into the halo, so we need to make the opening bigger regardless if we lower the stone now or not.
  • I need to have them add the cleaning holes to the pave portion of the bands.
  • The w-band isn't right either. I've kind of ignored it as the e-ring is more important, but essentially the inspiro ring has the pave sitting at a higher elevation level than the plain portion of the shank. In the replica, they are almost even.
  • I think once the issues with the e-ring are resolved, we can work on the alignment/fit of the w-band. Some of the issue in these pictures is the plastic molds came with both pieces attached at the bottom so they aren't fitting snug like the CAD's show.
  • Depending what Amy tells me, I am considering putting the revisions of hte w-band on hold until I can ensure we get the e-ring done and shipped to me by 6/29. I am running out of time.
  • I'm seriously considering letting my girl see the plastic models and get her input. She knows I'm up to something and that the ring is coming so this isn't a stealth operation by any stretch.
Obviously I would love to hear more of everyone's input and suggestions. For now, I'm going to grab some wings and maybe a few crown & cokes and let all this stew. :cool2:

I think focusing on the e-ring is definitely the best idea at this point. The w-band is very off and i really wouldn't bother until the e-ring is done. Once the iteration of the e-ring is complete, we can then pick apart the w-band.

E-ring, definitely need to see more flaring out of the swirl. DON'T LOWER IT! Please please don't! :pray: I only appreciated halos once i came to pricescope (yes, i'm a former hater of halos) and if you lower it too much it's going to be a halo. I think having the option there is good if she decides it's set too high after wearing it for some time but leave it as is now.

Tricky to say whether or not you should bring her in on it... i'm leaning to no. Considering how much trouble you had just getting what she likes out of her, i'm not sure she will be much help in saying exactly what she thinks should be changed with the wax mold. I'm kinda imagining you'll get..... "i'm not sure exactly what it is but i don't love it." or "there's just something about it that is off. i'm not positive what it is, you know?" :lol: I feel like you're doing a really great job of taking this setting she really loves and refining it. I say keep plugging away, you're doing GREAT and she will really appreciate this once it's all said and done!
 
Keep up the good work! I vote that you don't show her the work in progress. She has a memory of the ring in he store. When she sees the final ring, most of those elements will be present and it will be beautiful and shiny and given from you with an emotional delivery.

She has not been on this design journey with you and seeing a dull green bulky carving isn't going to match her "memory" ring *because* she hasn't walked along this path of several cad design images, revisions, tweaking, and now the mold.

I think (and I'm not her) it would be very difficult for me* to visualize the future transformation that will happen when the ring is finally cast by looking at this mold now. She has missed four-fifths of the process.

I can actually visualize it, because I have been following along with your design journey. She, however, hasn't. So, that's just me. :whistle:
 
Throwing in my 2 cents...I say do not bring her in at this point. I think you are getting close and bringing her in at this point may open a whole can
of worms if she is not good at visualization.

They really need to get that gap widened between the channel band and the pave band.
 
Wow. This is getting really close. What a patient person you are!

These are too small
upload_2018-6-8_9-0-33.png

These are better and are fine.
il_570xN.481707414_72or.jpg

If the pave band has squares, then I'd want the channel to as squares for access as well. These are nice and big. This will make the setting less hefty, but likely won't alter the price as this is a ton of finishing. But, dirty diamond can lose 2 color grades. So, you want to be able to clean and dry them well. You won't have these on the halo area just the shank.
f2d8391e2ba18a62ac2e71c875de03a1.jpg
Sorry to threadjack, but I have a question about this. I just received a setting from James Allen that doesn't have any holes on the underside of the band. In the recently sold images, all of them have the holes. I chatted with JA about it and they said that the holes are only used "if necessary". Should I request that it be remade with the holes?
 
GET 3 FREE HCA RESULTS JOIN THE FORUM. ASK FOR HELP
Top