Lykame
Brilliant_Rock
- Joined
- Jun 1, 2018
- Messages
- 1,473
So this has been a crazy journey for me.
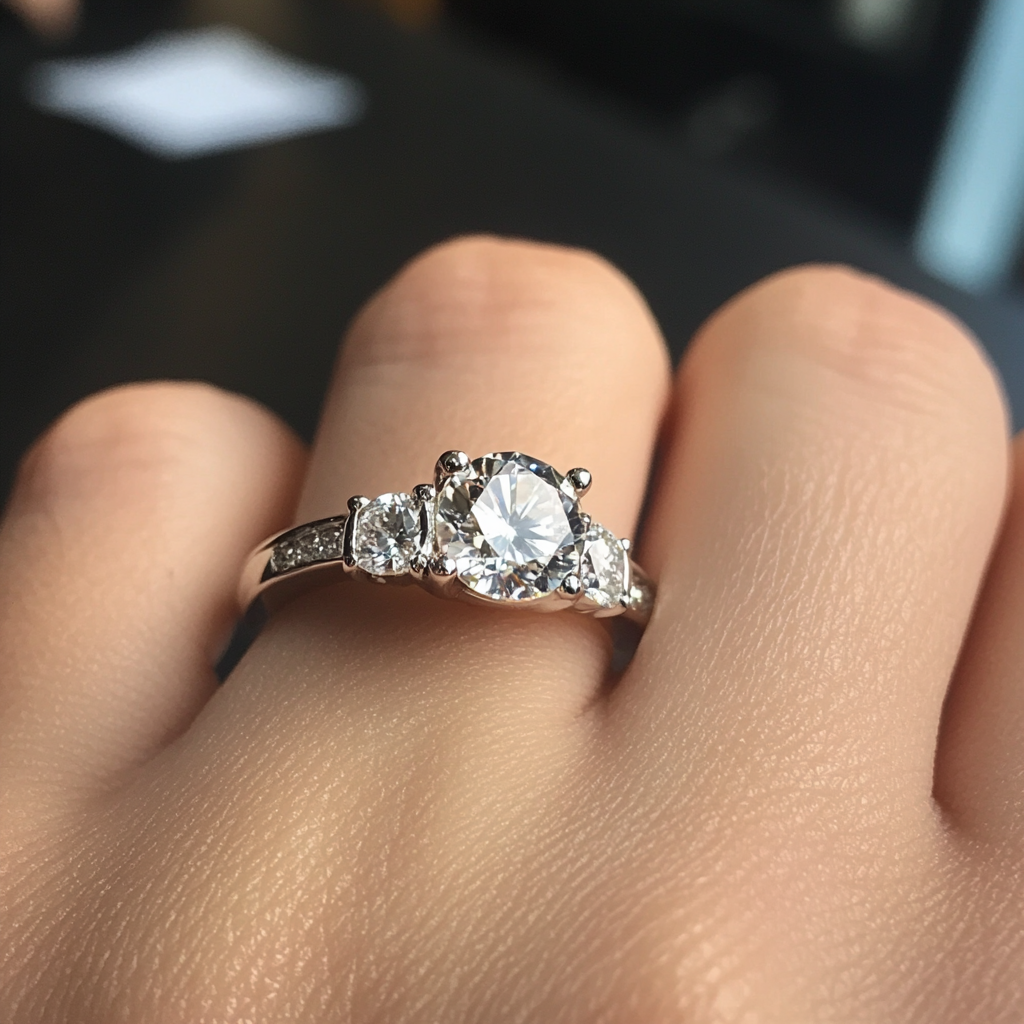
Introducing my new ring:

.JPG")


.jpg")

I figured I'd show some pictures first and then here is the long story for anyone who is interested in listening to my ramblings. It's a bit of a bumpy ride, but I promise there is a happy ending!
Central stone:
2.075 carats
J VS2
8.19 x 8.21 x 5.06 mm
Table 55.2 %
Crown 34.4 degrees
Pavilion 40.7 degrees
LGFs 76%
This amazing diamond is set into a custom platinum setting. The pavé is 2mm ideal cut melee, H VS quality. I've looked at the melee under an idealscope and they all have arrows! My ring size is a UK J and a half, which is sometimes a teeny bit loose on me but snug over my knuckle, which is what I like in a ring.
The setting has been made by Durham Rose, a jeweller in London. I have done numerous other threads on this long journey for me. Can you believe that there have been THREE previous versions of this ring and this is the fourth version???!!! What follows is a very honest and open story of this journey, the ups and the downs. Faye is the absolutely wonderful and amazing lady at Durham Rose who has been on this journey with me. As I have said in my other threads, I could not be more impressed with her, her patience, her awesomeness. I love Faye.
I picked up the first version at the very end of January. Whilst it was a beautiful ring, there were a number of issues with it. The main two issues were that one, I didn't feel it looked too much like the CADs I had approved, and that was understandably quite a big issue, and also disappointing. I had wanted really straight prongs and these prongs, whilst beautiful, were quite curved. And two, and more of an issue, the setting was really wonky and windswept. There were a few other tiny niggles that weren't really that significant but I noted them, too. I have to admit to having really high expectations, and I'm sure my time on Pricescope has only added to that. Slightly dangerous.

It was like that from the side view as shown above and also from the front view, too.
I was really confused, I couldn't really understand it. Why would a workbench have given out such a ring? Faye, however, was amazing. We met up, we discussed the issues, and Faye spontaneously said she felt the resolution to the issues was to remake the ring. It was absolutely the right thing to do, and I was so impressed. I gave the ring back (which was a bit painful) and waited with anticipation.
After just over six weeks (I think), ring version two arrived. Faye sent me a workshop video, which looked really awesome and epic, and we were both super excited (Faye has been so invested in this process, too, she has been so amazing). I travelled in to London to go and see it the first time, and Faye had seen it just before I did.
The ring was SO MUCH BETTER than the previous version, and the prongs were starting to look more like the CAD. But we were both in complete bafflement, because it was still wonky!!! Also the pavé metalwork wasn't quite as crisp as it had been before.


I did post a thread to introduce it, because it was stunning, but Faye and I already had a game plan. Faye had wanted to immediately try for version three without me needing to say anything, but I was concerned. It seemed very unusual for the same problem to happen twice, and so I wondered if the issue was a design problem rather than a workbench problem.
Faye went away to investigate it, and indeed it turned out that the most likely issue was a significant design problem. I'm going to plagiarise myself from my other thread:
Basically I didn't want an upper gallery (the band on many rings that runs close to the diamond girdle on a lot of settings, to sort of hold the prongs in place). I also didn't want a lower gallery (a doughnut, for example). I also wanted the part of the ring that was underneath the culet of the diamond to be the same height as the rest of the band (in my case, I wanted the band to be about 1.8mm tall so it was comfortable, and therefore the metal under the culet was also 1.8mm tall). I also wanted no element of the shank to be cathedral in nature.
I didn't ask for much, huh.
It appears that the reason in my many many hours of searching I had never encountered a ring that met those very specific criteria (perhaps somewhat obviously) was that it's actually really difficult to make a ring that meets that criteria but also doesn't suffer from structural issues. Faye and I have had some amazing conversations about this (as in genuinely amazing).
As a simplified explanation for why the ring had come out wonky on both occasions, prongs have pivot points. If you have a long unsupported prong, with not a lot of support at its base, and no upper gallery (basically what I wanted), the prong's pivot point is really low and the prong will pivot on that point when it's being manipulated. Pretty obvious in hindsight, really. So basically, both times the ring was made, the prongs came out somewhat wonky, and that led to the diamond sitting in the prongs at a tilt. The first time around it was really obvious, the ring essentially looked windswept from multiple angles. The second time around it was still obvious but definitely better. It certainly didn't appear to be a question of workmanship - it was more a structural and physics issue.
So Faye amazingly agreed to redesign the ring to remove this problem. As I really didn't want an upper gallery, we added more metal to the base of the prongs to make them more fully in cement, as it were. That made the pivot point higher up the length of the prong and made it much less likely to bend.
It theoretically meant some 'compromises'. One of the things I loved about the first couple of versions of the ring was that the diamond was 'floating' in the setting and the whole of its glory was on display (and boy was it glorious). To change it like this and also aim to get it looking even more like the CAD was going to mean burying the culet slightly into the setting, but I asked that it still be visible even if it was just to me. It did make me a little bit nervous, because the floating diamond effect of the previous versions was pretty epic. But I could feel in my bones it was the right decision.
The best thing about waiting for version three was that I was able to keep version two ring until the very last minute, and then give it back at the stage where the diamonds needed setting. This meant that even though it was wonky, I really got to enjoy it for the time that I had it. It was an honour.
I never saw version three apart from by video. Faye was not happy with it, and basically contacted me to say that version four had already been cast! Having said that, I could immediately tell that the new design was PERFECT. I was soooo relieved and excited!!!
Finally, finally, after some weeks without my ring, my ring was delivered to me by post. I was really gutted I didn't have time in my schedule to go into London to pick it up on a day that Faye would have been there, but I was due some annual leave with a holiday to Menorca (so awesome) and I really wanted the ring before then. I knew that I was definitely going to need some processing time with my ring, I'm just that sort of person. To have missed the opportunity to have it on my holiday would have been sad.
I'll be honest, I made some mistakes with the way I first looked at the ring, which was pretty stupid. I opened it straight after coming back from a number of very difficult shifts at work, in probably the worst lighting of my house with directional light as well from some glass door windows. In fact, the whole month before had all been pretty tough and challenging. I was in dire need of a holiday. My first impression, especially as I took some pictures of the ring as I was opening it, was that the ring was still wonky. I was pretty gutted. The ring is a cast ring polished down, and I also thought, when I looked at the pictures, that the polishing on the prongs could be better. It was something I initially really struggled with.
However - happy ending - after 24-48 hours, I was able to be way more objective and I realised that my very first impression was really because of the lighting in that particular part of the house, and then pretty magnified pictures highlighting that even further. The diamond was actually set perfectly, and wasn't wonky at all! It was just the way the light was hitting the prongs, and it created quite a strong optical illusion.
I also realised that yes, okay, the metalwork on the prongs perhaps wasn't quite as polished as I have seen on some of the hand-forged rings on here, but all the prongs were polished in the same way (symmetry is important to me). In the majority of lighting the metalwork is really smooth and shiny. To me it just looks hand-finished, and I have decided that this is very charming rather than a negative thing. I don't think it is worth the risk to try and make the prongs any smoother than they already are (and I think it would be difficult as well as actually, they're already very smooth despite my first impression). In some of the magnified photos I can see it a little, but in real life it's nearly never noticable and so minor.
Going through the process of initially finding fault with the ring then allowed me to really start to thoroughly enjoy all the things that I LOVE about the ring! And I love this ring. It is absolutely amazing, I am so lucky and honoured to have it.
I love the design, I love how straight the prongs are, I love how solid and chunky it is. I love that it looks like the CAD. I love that with the current setting it's actually more difficult for me to see the tint of the J diamond from the side. With the floating versions it was quite easy for me to see the tint from the side, and perhaps that bothered me a tiny bit. With this setting it's really difficult to see the tint from the side and that's really helped. I also love that I can see the culet if I look at just the right angle. I had worried I was making a compromise, but I wasn't making a compromise at all. I love the pavé - it is absolute perfection, so much better than version 2! I love the paw print engraving that I have in memory of my Westie, Eric. At work I wear my ring on a necklace and I can see the paw print when I look down. It is very special.
.jpg")
And finally I love the central diamond. The CBI is just... out of this world. Need I say more? None of the photos I have taken can possibly do it justice.
Thank you so much to Durham Rose for sticking with me through this process. Even more so thanks to Faye. This would never have happened without her. I can't imagine any other jewellery company going through such an extended process for their customer. I was especially impressed because there was clearly quite a lot of learning during this process for them, as well, and they handled it all with such grace. The service I received was priceless and I would have no hesitation in using them again. They have my business for life.
In that regard - the next plan is the matching band and a spacer.
Introducing my new ring:
I figured I'd show some pictures first and then here is the long story for anyone who is interested in listening to my ramblings. It's a bit of a bumpy ride, but I promise there is a happy ending!
Central stone:
2.075 carats
J VS2
8.19 x 8.21 x 5.06 mm
Table 55.2 %
Crown 34.4 degrees
Pavilion 40.7 degrees
LGFs 76%
This amazing diamond is set into a custom platinum setting. The pavé is 2mm ideal cut melee, H VS quality. I've looked at the melee under an idealscope and they all have arrows!
The setting has been made by Durham Rose, a jeweller in London. I have done numerous other threads on this long journey for me. Can you believe that there have been THREE previous versions of this ring and this is the fourth version???!!! What follows is a very honest and open story of this journey, the ups and the downs. Faye is the absolutely wonderful and amazing lady at Durham Rose who has been on this journey with me. As I have said in my other threads, I could not be more impressed with her, her patience, her awesomeness. I love Faye.
I picked up the first version at the very end of January. Whilst it was a beautiful ring, there were a number of issues with it. The main two issues were that one, I didn't feel it looked too much like the CADs I had approved, and that was understandably quite a big issue, and also disappointing. I had wanted really straight prongs and these prongs, whilst beautiful, were quite curved. And two, and more of an issue, the setting was really wonky and windswept. There were a few other tiny niggles that weren't really that significant but I noted them, too. I have to admit to having really high expectations, and I'm sure my time on Pricescope has only added to that. Slightly dangerous.
It was like that from the side view as shown above and also from the front view, too.
I was really confused, I couldn't really understand it. Why would a workbench have given out such a ring? Faye, however, was amazing. We met up, we discussed the issues, and Faye spontaneously said she felt the resolution to the issues was to remake the ring. It was absolutely the right thing to do, and I was so impressed. I gave the ring back (which was a bit painful) and waited with anticipation.
After just over six weeks (I think), ring version two arrived. Faye sent me a workshop video, which looked really awesome and epic, and we were both super excited (Faye has been so invested in this process, too, she has been so amazing). I travelled in to London to go and see it the first time, and Faye had seen it just before I did.
The ring was SO MUCH BETTER than the previous version, and the prongs were starting to look more like the CAD. But we were both in complete bafflement, because it was still wonky!!!
Also the pavé metalwork wasn't quite as crisp as it had been before. I did post a thread to introduce it, because it was stunning, but Faye and I already had a game plan. Faye had wanted to immediately try for version three without me needing to say anything, but I was concerned. It seemed very unusual for the same problem to happen twice, and so I wondered if the issue was a design problem rather than a workbench problem.
Faye went away to investigate it, and indeed it turned out that the most likely issue was a significant design problem. I'm going to plagiarise myself from my other thread:
Basically I didn't want an upper gallery (the band on many rings that runs close to the diamond girdle on a lot of settings, to sort of hold the prongs in place). I also didn't want a lower gallery (a doughnut, for example). I also wanted the part of the ring that was underneath the culet of the diamond to be the same height as the rest of the band (in my case, I wanted the band to be about 1.8mm tall so it was comfortable, and therefore the metal under the culet was also 1.8mm tall). I also wanted no element of the shank to be cathedral in nature.
I didn't ask for much, huh.
It appears that the reason in my many many hours of searching I had never encountered a ring that met those very specific criteria (perhaps somewhat obviously) was that it's actually really difficult to make a ring that meets that criteria but also doesn't suffer from structural issues. Faye and I have had some amazing conversations about this (as in genuinely amazing).
As a simplified explanation for why the ring had come out wonky on both occasions, prongs have pivot points. If you have a long unsupported prong, with not a lot of support at its base, and no upper gallery (basically what I wanted), the prong's pivot point is really low and the prong will pivot on that point when it's being manipulated. Pretty obvious in hindsight, really. So basically, both times the ring was made, the prongs came out somewhat wonky, and that led to the diamond sitting in the prongs at a tilt. The first time around it was really obvious, the ring essentially looked windswept from multiple angles. The second time around it was still obvious but definitely better. It certainly didn't appear to be a question of workmanship - it was more a structural and physics issue.
So Faye amazingly agreed to redesign the ring to remove this problem. As I really didn't want an upper gallery, we added more metal to the base of the prongs to make them more fully in cement, as it were. That made the pivot point higher up the length of the prong and made it much less likely to bend.
It theoretically meant some 'compromises'. One of the things I loved about the first couple of versions of the ring was that the diamond was 'floating' in the setting and the whole of its glory was on display (and boy was it glorious). To change it like this and also aim to get it looking even more like the CAD was going to mean burying the culet slightly into the setting, but I asked that it still be visible even if it was just to me. It did make me a little bit nervous, because the floating diamond effect of the previous versions was pretty epic. But I could feel in my bones it was the right decision.
The best thing about waiting for version three was that I was able to keep version two ring until the very last minute, and then give it back at the stage where the diamonds needed setting. This meant that even though it was wonky, I really got to enjoy it for the time that I had it. It was an honour.
I never saw version three apart from by video.
Finally, finally, after some weeks without my ring, my ring was delivered to me by post. I was really gutted I didn't have time in my schedule to go into London to pick it up on a day that Faye would have been there, but I was due some annual leave with a holiday to Menorca (so awesome) and I really wanted the ring before then. I knew that I was definitely going to need some processing time with my ring, I'm just that sort of person. To have missed the opportunity to have it on my holiday would have been sad.
I'll be honest, I made some mistakes with the way I first looked at the ring, which was pretty stupid. I opened it straight after coming back from a number of very difficult shifts at work, in probably the worst lighting of my house with directional light as well from some glass door windows. In fact, the whole month before had all been pretty tough and challenging. I was in dire need of a holiday. My first impression, especially as I took some pictures of the ring as I was opening it, was that the ring was still wonky. I was pretty gutted. The ring is a cast ring polished down, and I also thought, when I looked at the pictures, that the polishing on the prongs could be better. It was something I initially really struggled with.
However - happy ending - after 24-48 hours, I was able to be way more objective and I realised that my very first impression was really because of the lighting in that particular part of the house, and then pretty magnified pictures highlighting that even further. The diamond was actually set perfectly, and wasn't wonky at all! It was just the way the light was hitting the prongs, and it created quite a strong optical illusion.
I also realised that yes, okay, the metalwork on the prongs perhaps wasn't quite as polished as I have seen on some of the hand-forged rings on here, but all the prongs were polished in the same way (symmetry is important to me). In the majority of lighting the metalwork is really smooth and shiny. To me it just looks hand-finished, and I have decided that this is very charming rather than a negative thing. I don't think it is worth the risk to try and make the prongs any smoother than they already are (and I think it would be difficult as well as actually, they're already very smooth despite my first impression). In some of the magnified photos I can see it a little, but in real life it's nearly never noticable and so minor.
Going through the process of initially finding fault with the ring then allowed me to really start to thoroughly enjoy all the things that I LOVE about the ring! And I love this ring. It is absolutely amazing, I am so lucky and honoured to have it.
I love the design, I love how straight the prongs are, I love how solid and chunky it is. I love that it looks like the CAD. I love that with the current setting it's actually more difficult for me to see the tint of the J diamond from the side. With the floating versions it was quite easy for me to see the tint from the side, and perhaps that bothered me a tiny bit. With this setting it's really difficult to see the tint from the side and that's really helped. I also love that I can see the culet if I look at just the right angle. I had worried I was making a compromise, but I wasn't making a compromise at all. I love the pavé - it is absolute perfection, so much better than version 2! I love the paw print engraving that I have in memory of my Westie, Eric.
At work I wear my ring on a necklace and I can see the paw print when I look down. It is very special.And finally I love the central diamond. The CBI is just... out of this world. Need I say more? None of the photos I have taken can possibly do it justice.
Thank you so much to Durham Rose for sticking with me through this process. Even more so thanks to Faye. This would never have happened without her. I can't imagine any other jewellery company going through such an extended process for their customer. I was especially impressed because there was clearly quite a lot of learning during this process for them, as well, and they handled it all with such grace. The service I received was priceless and I would have no hesitation in using them again. They have my business for life.
In that regard - the next plan is the matching band and a spacer.
 I'm with you on the chunkier look. I was admiring my sister-in-law's setting last night, and her setting is quite similar to yours: strong prongs but not clunky. It's a proud, vintage look that's so timeless and elegant!


300x240.png)