shape
carat
color
clarity

My handmade velvet ring box and cushion halo earrings

Please note that if you guys wanna make a bigger box, you will need a bit wider velvet ribbon.
 
Good luck junebug17! Glad you found some velvet. :) The ones I found weren't stored behind the counter at my store, so you must have gotten a really really nice velvet! What ribbon color did you get to go with your maroon fabric?
 
Hi all, just a clarification on my modification. For the liner, the 3.3 cm is the square base, so add 2 cm to 3.3 cm and cut 5.3 cm square, then cut out 1 cm corners for the lid liner and then fold. So 7.3 cm square for bottom liner and then cut out 2 cm corners to fold. I just realized how confusing that part might have been to understand.
 
fussykiki|1431569489|3876407 said:
Please note that if you guys wanna make a bigger box, you will need a bit wider velvet ribbon.

Oh, thanks for mentioning this...I have never tried it out w/ velvet ribbon.
 
_lovesvintage_|1431569616|3876411 said:
Good luck junebug17! Glad you found some velvet. :) The ones I found weren't stored behind the counter at my store, so you must have gotten a really really nice velvet! What ribbon color did you get to go with your maroon fabric?

Thanks loves vintage! Yes, it's pretty nice - but I agree that using the fabric seems harder than the ribbon, with the ribbon all the edges are even, with the fabric you have to cut it and it just adds another step. I just ended up getting a matching maroon ribbon.

I've run into a snafu so I'm going to call it quits for tonight. I ran into a problem wrapping the fabric around the box to figure out how much you need to cover the outside of the box, I made it too long so the fabric was too loose around the box after I sewed it - I'm thinking I might measure the fabric to get it more accurate. I'm determined to do this, or at least get close!
 
junebug17|1431576287|3876465 said:
_lovesvintage_|1431569616|3876411 said:
Good luck junebug17! Glad you found some velvet. :) The ones I found weren't stored behind the counter at my store, so you must have gotten a really really nice velvet! What ribbon color did you get to go with your maroon fabric?

Thanks loves vintage! Yes, it's pretty nice - but I agree that using the fabric seems harder than the ribbon, with the ribbon all the edges are even, with the fabric you have to cut it and it just adds another step. I just ended up getting a matching maroon ribbon.

I've run into a snafu so I'm going to call it quits for tonight. I ran into a problem wrapping the fabric around the box to figure out how much you need to cover the outside of the box, I made it too long so the fabric was too loose around the box after I sewed it - I'm thinking I might measure the fabric to get it more accurate. I'm determined to do this, or at least get close!

Velvet fabric is stretchy where velvet ribbon is non-stretch. If you use fabric you will need to shorten the length of it so when you wrap it to the box, it hangs in there smoothly. Take a break or work on the inner layers first.
 
fussykiki|1431577248|3876471 said:
junebug17|1431576287|3876465 said:
_lovesvintage_|1431569616|3876411 said:
Good luck junebug17! Glad you found some velvet. :) The ones I found weren't stored behind the counter at my store, so you must have gotten a really really nice velvet! What ribbon color did you get to go with your maroon fabric?

Thanks loves vintage! Yes, it's pretty nice - but I agree that using the fabric seems harder than the ribbon, with the ribbon all the edges are even, with the fabric you have to cut it and it just adds another step. I just ended up getting a matching maroon ribbon.

I've run into a snafu so I'm going to call it quits for tonight. I ran into a problem wrapping the fabric around the box to figure out how much you need to cover the outside of the box, I made it too long so the fabric was too loose around the box after I sewed it - I'm thinking I might measure the fabric to get it more accurate. I'm determined to do this, or at least get close!

Velvet fabric is stretchy where velvet ribbon is non-stretch. If you use fabric you will need to shorten the length of it so when you wrap it to the box, it hangs in there smoothly. Take a break or work on the inner layers first.

Fussykiki you are so helpful! One question for you, when you are wrapping the outer box, what's your method? Do you do corners first, or do you just start on one side and go around?
 
LuckyKelleyK|1431580172|3876479 said:
fussykiki|1431577248|3876471 said:
junebug17|1431576287|3876465 said:
_lovesvintage_|1431569616|3876411 said:
Good luck junebug17! Glad you found some velvet. :) The ones I found weren't stored behind the counter at my store, so you must have gotten a really really nice velvet! What ribbon color did you get to go with your maroon fabric?

Thanks loves vintage! Yes, it's pretty nice - but I agree that using the fabric seems harder than the ribbon, with the ribbon all the edges are even, with the fabric you have to cut it and it just adds another step. I just ended up getting a matching maroon ribbon.

I've run into a snafu so I'm going to call it quits for tonight. I ran into a problem wrapping the fabric around the box to figure out how much you need to cover the outside of the box, I made it too long so the fabric was too loose around the box after I sewed it - I'm thinking I might measure the fabric to get it more accurate. I'm determined to do this, or at least get close!

Velvet fabric is stretchy where velvet ribbon is non-stretch. If you use fabric you will need to shorten the length of it so when you wrap it to the box, it hangs in there smoothly. Take a break or work on the inner layers first.

Fussykiki you are so helpful! One question for you, when you are wrapping the outer box, what's your method? Do you do corners first, or do you just start on one side and go around?

I fold in the middle of the four edges first, then I push the corners in.
 
Since I cannot link to my blog, I just post the instructions here:

Materials: 1mm cardboard, 4 cm wide velvet ribbon, 4 cm wide ribbon with matching color, gold embroidery thread, scrap white satin cloth or white color silk ribbon, doubles-side tape, masking tape, glue gun, scissors, ruler.

Step 1 - box outer layer: Cut two pieces in the size of 1.8 cm x 12.8 cm (for the lid) and 1.4 cm x 12.8 cm (for the bottom). Fold them into square shape and secure with masking tape. Wrap velvet ribbon around the outer layer to get the required length and sew ribbon right side together. Wrap velvet ribbon to the outer layer with double-side tape.


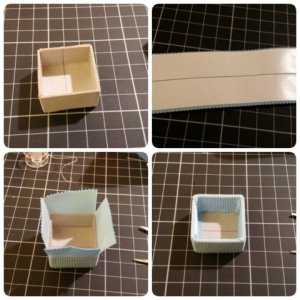
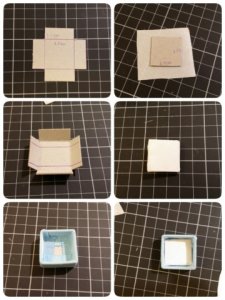
Step 2 - box liner layer: Cut cardboard pieces in size of 5.8 cm x 5.8 cm then cut a 1.1 cm x 1.1 cm square from each corner (for the bottom) and 5 cm x 5 cm and then cut a 1 cm x 1 cm square from each corner (for the lid). Fold into a box and secure with masking tape. Wrap liner layers with ribbon as shown in below. For the lid, also cut cardboard in size of 2.5 cm x 2.5 cm and wrap with white satin cloth and stick to inside of the lid.


Step 3 - Making the velvet cover for lid and bottom: Cut two cardboard in size of 2.8 cm x 2.8 cm and wrap with velvet ribbon. You can embroidery your initial with gold embroidery thread for the lid. Insert inner layers to outer layers and secure with glue gun. Also stick the velvet covers to the lid and bottom with glue gun.

2015-05-14-13-26-15_deco_resized.jpg

2015-05-14-13-27-25_deco_resized.jpg

2015-05-14-13-27-55_deco_resized.jpg

2015-05-14-13-28-56_deco_resized.jpg
 
Step 4 - making the sponge bed for your ring: cut two piece of sponge in size of 2.5 cm x 1.2 cm and wrap with velvet ribbon. I used double-side tape to adhese the velvet ribbon to the sponge. Glue the sponge into the bottom, and you have made you own vintage velvet ring box!

2015-05-14-13-29-42_deco_resized.jpg
 
Absolutely gorgeous earrings! I've had a crush on the ones that Yolanda wears from RHBH for a while now. These are even better! Any chance of an ear shot?

And you are incredibly brilliant to have taken the time to make your own velvet box, not to mention generous to share your step-by-step instructions! Gorgeous and far more cost effective than the Mrs. Box. Just awesome! Thank you :)
 
My ring box is done! :) I am pretty pleased with it. No bunching...woohoo! It was also my first attempt at free hand embroidering, which turned out ok. Here are the official pics.

_30216.jpg

_30217.jpg

img_20150514_050737.jpg

img_20150514_051027.jpg
 
It's beautiful lovesvintage! Love the color. :love:

I cannot wait to see everyone's homemade ring boxes. Really beautiful!


Fussykiki, I love that you shared this with us and how talented and creative you are! :appl:

Junie, I cannot wait to see yours and your new ring in it!
 
Lovesvintage, you have very good embroidery skill!!!!!
 
fussykiki|1431577248|3876471 said:
Velvet fabric is stretchy where velvet ribbon is non-stretch. If you use fabric you will need to shorten the length of it so when you wrap it to the box, it hangs in there smoothly. Take a break or work on the inner layers first.

Ok, thanks fussykiki! I'll keep trying, thanks again for the instructions, I'm going to do this!
 
Lovesvintage, it looks fantastic, you did such a great job! Your embroidery is beautifully done! :dance:
 
_lovesvintage_|1431598948|3876535 said:
My ring box is done! :) I am pretty pleased with it. No bunching...woohoo! It was also my first attempt at free hand embroidering, which turned out ok. Here are the official pics.
Awesome! I think its great
 
Thank you Missy, fussykiki, junebug17 and Niel! It is so soft and I like that it stays together. I know I changed it up a bit, but this one works for me. I was so excited to finish it that I didn't post a pic with rings in it! My bad. I will do that later today and see if it will fit two bands or not with the larger ring too for reference, since some people have sets that stack two bands and the engagement ring. It may not work though.
 
Took a close-up picture and ear shot in the morning. :appl:

2015-05-15-08-38-27_deco.jpg

2015-05-15-08-37-36_deco.jpg
 
Wow, your box looks so beautiful fussykiki! I love the color, the velvet looks really nice. And the workmanship is great!

And your earrings are absolutely stunning!!! :love:
 
OK, here is the pic. I know it is not a true wedding set, but I wanted to give a reference in size for the ladies out there with those huge rocks (even though it still may not include some of you :) ). The ring is about 12 mm in length and the band about 2.5 mm ( I don't own calipers). And no...two bands will not fit underneath the ring.

Junebug17, since you have real velvet fabric also, I recommend practicing the hot glue gun technique on velvet scraps before using it on the real one. Tape some to cardboard and try glueing the pieces together. I learned that there is a finesse to using it without letting it show and without getting it on the velvet. This was the first time I used it on a project that required it while making something pretty. I don't know how many kinds of glue guns there are, but when it oozes, clean the tip by rubbing it on the scrap cardboard. So, have the box in hand where you want to glue, squeeze it slightly to create a space where the glue is going, with your other hand grab the glue gun and clean the tip, go for the spot, squeeze gently and spread the glue, wipe the tip off in the space, put the glue gun down, and use both your hands to hold the glued parts together. When glueing on the lid and bottom covers, you will have to gently push the velvet nap together and hold for a little bit to let the glue take.

img_20150514_191851.jpg
 
fussykiki|1431650441|3876900 said:
Took a close-up picture and ear shot in the morning. :appl:

Very pretty fussykiki!!! Thanks for sharing more pics of the box and earrings. You are so lucky!!! And I agree with junebug17...you are very talented!
 
_lovesvintage_|1431650730|3876906 said:
OK, here is the pic. I know it is not a true wedding set, but I wanted to give a reference in size for the ladies out there with those huge rocks (even though it still may not include some of you :) ). The ring is about 12 mm in length and the band about 2.5 mm ( I don't own calipers). And no...two bands will not fit underneath the ring.

Junebug17, since you have real velvet fabric also, I recommend practicing the hot glue gun technique on velvet scraps before using it on the real one. Tape some to cardboard and try glueing the pieces together. I learned that there is a finesse to using it without letting it show and without getting it on the velvet. This was the first time I used it on a project that required it while making something pretty. I don't know how many kinds of glue guns there are, but when it oozes, clean the tip by rubbing it on the scrap cardboard. So, have the box in hand where you want to glue, squeeze it slightly to create a space where the glue is going, with your other hand grab the glue gun and clean the tip, go for the spot, squeeze gently and spread the glue, wipe the tip off in the space, put the glue gun down, and use both your hands to hold the glued parts together. When glueing on the lid and bottom covers, you will have to gently push the velvet nap together and hold for a little bit to let the glue take.

My friend asks me if I can make one that fits her e-ring, wedding band, and eternity band. Since her rings are thin, maybe I follow your size and try to cut the sponge into 4 pieces to accommodate 3 rings. Let's see how it goes.

Lovesvintage, I made a mess with the glue gun too coz the wire is too short and I have to knee down on the floor to use it..... It would be still okay only if I am not 6 months pregnant. ;( By the time I got back to my desk, the glue already dried. I have to peel it off and re-apply. :lol:
 
_lovesvintage_|1431650907|3876909 said:
fussykiki|1431650441|3876900 said:
Took a close-up picture and ear shot in the morning. :appl:

Very pretty fussykiki!!! Thanks for sharing more pics of the box and earrings. You are so lucky!!! And I agree with junebug17...you are very talented!

The seams of the velvet bugs me tho. I wonder how Mrs. Box can do it so perfectly and eliminated the bulk at the seam area. I hope I can see the real Mrs. Box to find it out.
 
Fussy Kiki , Your earings are beautiful and look gorgeous on you. Thank you for all the work you have put into helping everyone make their own Mrs Boxes. Your looks beautiful.

Loves Vintage. You can do free hand embroidery? Wow. Your box turned out beautiful.

You girls are amazing!
 
"My friend asks me if I can make one that fits her e-ring, wedding band, and eternity band. Since her rings are thin, maybe I follow your size and try to cut the sponge into 4 pieces to accommodate 3 rings. Let's see how it goes.

Lovesvintage, I made a mess with the glue gun too coz the wire is too short and I have to knee down on the floor to use it..... It would be still okay only if I am not 6 months pregnant. ;( By the time I got back to my desk, the glue already dried. I have to peel it off and re-apply. :lol: "

That sounds like it could work, especially since you said that she has thin rings. Please show pics when it is done b/c I am curious too.

Do you have outlets that are higher up? That is what I used so I could sit and work. Maybe go to your kitchen to do that part. I can't image doing this while being 6 mos pregnant the way you have to... Bravo! :clap:
 
"The seams of the velvet bugs me tho. I wonder how Mrs. Box can do it so perfectly and eliminated the bulk at the seam area. I hope I can see the real Mrs. Box to find it out."


They probably attach it to a thinner piece of fabric where we have to fold it at the seam...just enough velvet to meet edge to edge and then the other supplemental fabric. Or maybe they use enough to run the length of that side. I will try the first method I mentioned if I make any more later on. That means I would have to know the exact length to sew it and have it meet edge to edge.

I don't own a Mrs. Box, but I wouldn't undo it to find out. :)
 
junebug17|1431544597|3876193 said:
I know, right? You would think a fabric store would have it :wall: I thought finding the ribbon would be the least of our problems lol! I was really all set to do this, frustrating!

I'll look around on -line and see what I can find - I checked out the site suggested by fussykiki (Britex) but I don't think most of the velvet ribbon is the right width :read: A few are - if my math is right and 4 cm is equal to 1.5 inches.

I looked at Britex's website again. They have 20 colors for 1.5 inches single-face velvet ribbon, including few pink shades, purple, light blue and green. They are made in Switzerland, I think they must be very soft. Oh, I want some of those....
 
fussykiki|1431663256|3876957 said:
junebug17|1431544597|3876193 said:
I know, right? You would think a fabric store would have it :wall: I thought finding the ribbon would be the least of our problems lol! I was really all set to do this, frustrating!

I'll look around on -line and see what I can find - I checked out the site suggested by fussykiki (Britex) but I don't think most of the velvet ribbon is the right width :read: A few are - if my math is right and 4 cm is equal to 1.5 inches.

I looked at Britex's website again. They have 20 colors for 1.5 inches single-face velvet ribbon, including few pink shades, purple, light blue and green. They are made in Switzerland, I think they must be very soft. Oh, I want some of those….

Yes, went back and had another look, there are more than I thought…if I can make this fairly well, I might treat myself to a few colors!
 
junebug17 said:
fussykiki|1431663256|3876957 said:
junebug17|1431544597|3876193 said:
I know, right? You would think a fabric store would have it :wall: I thought finding the ribbon would be the least of our problems lol! I was really all set to do this, frustrating!

I'll look around on -line and see what I can find - I checked out the site suggested by fussykiki (Britex) but I don't think most of the velvet ribbon is the right width :read: A few are - if my math is right and 4 cm is equal to 1.5 inches.

I looked at Britex's website again. They have 20 colors for 1.5 inches single-face velvet ribbon, including few pink shades, purple, light blue and green. They are made in Switzerland, I think they must be very soft. Oh, I want some of those….

Yes, went back and had another look, there are more than I thought…if I can make this fairly well, I might treat myself to a few colors!

I checked out that site too now and decided to go for the silk ones. :)
 
GET 3 FREE HCA RESULTS JOIN THE FORUM. ASK FOR HELP
Top